
Create Automations
The automation functionality allows you to create automatic flows so that email campaigns are sent only to subscribers who meet one or more conditions or who perform or do not perform a specific action. This way, each campaign will be sent at the precise moment to each person, which will significantly improve the open rate and the level of interaction with your email content.
You can take a look at effective use cases of automatic flows in our complete guide on email marketing automation.
In this article:
Create an automation
Within the Newsletters section, you can access the Automations section and start creating your automatic sending flow.
To do this, you just need to click on the New Automation button, choose the name and description (which will only be visible to you) and click on Create.

Once the automation is created, you need to choose the list to which you want it to be sent, and the type of event that will trigger the start of the automation. The types of events you can choose from are:
- New subscriber in the list: When a subscriber signs up for the selected list, they will enter the automatic flow and receive the scheduled emails as they meet the conditions you set.
- Specific date: You can choose a specific date when subscribers who meet the conditions at that moment will start going through the automatic flow, and no more will enter after that date.
- New subscriber in a segment of the list: You can choose to have only subscribers from a specific segment of the list go through the automatic flow, for example, those who have downloaded a specific resource from your website.
Initial event of the automation
If you select new subscriber in the list or segment as the initial event, you can also decide whether you want the rest of the subscribers already registered in the list to be included or not. If you check the Apply to current subscribers box, all users included in the list or segment at this moment will go through the automation.
By default, this box is unchecked and, in this case, the automatic flow will only be sent to subscribers who sign up for the list from the moment the automation is executed onwards.
Nodes of the automatic flow
The automatic flow consists of different nodes or modules where you can choose the conditions that must be met for subscribers to go through the flow. Below you can check in detail the different conditions that each node allows, and their use cases:
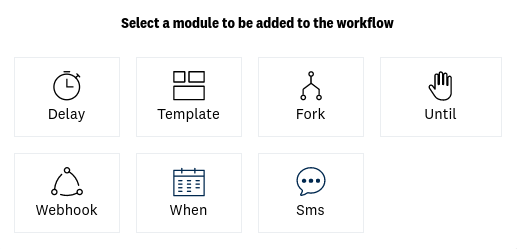
Wait
This module allows you to set a time interval between a first condition (for example, the subscriber signs up for a list) and the next action (the subscriber moves through the flow and receives a campaign, etc.)
An example could be the following: A subscriber signs up for a list, the wait node is set for one minute, and moves to the next one where a welcome email is sent.

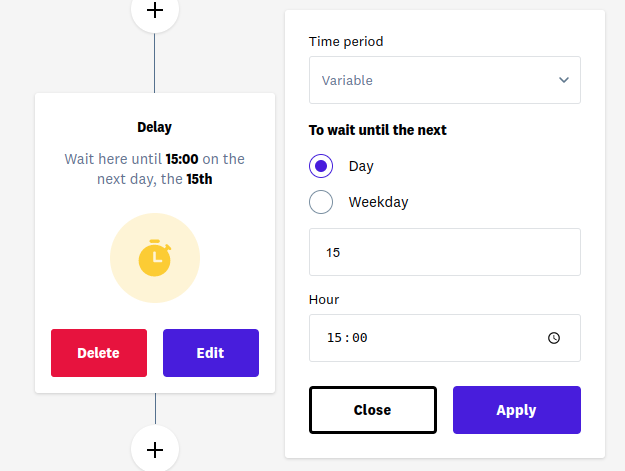
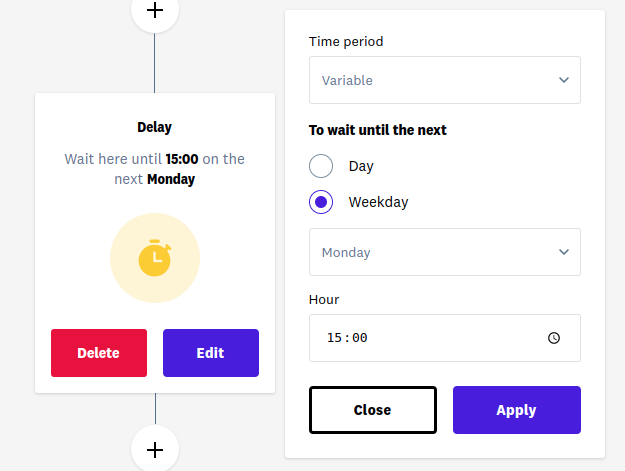
There are two modes of waiting, fixed and variable. The fixed mode means that the subscriber always waits a predetermined time and that it is always the same for everyone. For example, 2 minutes, 3 hours, 4 days.
However, the variable mode means that the subscriber will wait until the next indicated day and that it will be longer or shorter depending on the day they are on.
This variable time can be based on a day of the month or a day of the week.
For example, based on the day of the month, if it is set until the next April 15 at 3:00 PM and the subscriber signs up on April 12, they will wait until April 15 at that time, but for example, another subscriber signs up on April 17, then they will wait until the next May 15.
For example, based on the day of the week, wait until the next Monday. If a subscriber signs up on a Friday, they will move to the next node on Monday.
Template
The Send Template module is equivalent to sending an email within the automation. The parameters you will need to choose are the same as when creating a normal campaign, only in this case you will do it directly within the automation. The steps are:
- Campaign name: It will only be visible to you, as in a normal campaign. We recommend numbering the emails in the flow in consecutive order to make tracking easier later.
- Email and sender name: The sender that your subscribers will see when receiving the email
- Email subject: Just like in normal campaigns, remember that you can add custom tags or emojis
- Select template: Keep in mind that *you must have the emails created in advance* (from Templates) and then select it
- Activate Google Analytics tracking through UTM values and tracking of clicks on email links
- Subdomain for links: Just like in a normal campaign, you can customize the domain and subdomain of the links within the email. In this case, we want all links to start with: ayuda.acumbamail.com. To configure the subdomain, you must have previously followed these steps.

If you make changes later to the template you have chosen to send, you will need to edit the Send template node again and reselect the modified template by clicking on the Select template button for the changes to be registered. To do this, you will need to stop the automation first.
SMS
Our platform allows for sending text messages separately, but you can also include them in automated flows to easily combine email and SMS sending.
The SMS module will allow you to choose the subscriber's Phone field and send a message to their mobile if they meet the conditions you have pre-established. If the subscriber's Phone field is empty, corresponds to an incorrect number, or you do not have credits to send SMS, this node will be ignored and the subscriber will move to the next one established in the flow.
You can customize the sender as you wish (remember not to add spaces and not to exceed 11 characters) and the message text, adding custom tags, emojis, or links.

The Condition module allows you to branch the flow into two to send different campaigns to those subscribers who meet different conditions. If the established conditions are met, the subscriber will advance through the YES branch, and if they are not met, through the NO branch.
To make this division, you can follow different criteria:
Rules
The Rules condition type is governed by the fields of your subscriber list: you can set various conditions and the subscriber will advance through the YES branch if all of them are met (if you select All) or any of them (if you select Any).
For each rule, you must select a field from the list, an operator (Greater than, Less than, Equal, Not equal, Contains, Does not contain) and a value for that field.

Behavior
The Behavior condition type will allow you to branch the flow according to the behavior that the subscriber has had with a previous campaign.
You must select one of the following values: Opens Campaign, does not open campaign, clicks (on any link within the email), does not click, and whether that value has been met or not. In this way, you will establish the criterion for which of the two branches (YES or NO) the subscriber should continue through the flow.

Until
The Until option works similarly to the Condition. You can set Rules or Behaviors conditions, and the subscriber will not advance through this module until the condition or conditions you have configured are met, regardless of the time that passes until this change of state occurs.
For example, you can choose not to send another email to your subscriber until they open the previous one (you would use the Behavior option > Opens campaign X).

Webhook
With the option to integrate a webhook with GET or POST parameters, you can create a request to your own URL to notify you when a subscriber has passed through a specific module of the automation or has met a certain condition. You can find more information about webhooks in this article.

You just need to indicate the URL to call and what data Acumbamail will send. In the "body" you must enter the information in JSON format, putting key-value pairs, where the key can be any identifying text of your choice. To indicate the value, you have the content tag commands associated with each of the fields in your list. For a list with the fields "email", "name", and "phone", this would be a possible body:
{"phone": "*|PHONE|*", "email": "*|EMAIL|*", "name": "*|NAME|*"}
When
The operation of the When node, like that of the Wait node: allows stopping the flow of the automation until a future moment. In a When node, the future moment will be indicated by entering a specific date and time, unlike the Wait node which jumps to the next node a time after the flow of the automation reaches the Wait node.

Move to
The "Move to" option allows us to move all subscribers who reach this node to any other node in the automation. To do this, it is necessary to select the destination node from the dropdown, which will contain all possible options. Care must be taken to avoid introducing infinite loops, as any subscriber who reaches this node will be moved to the destination node. Thus, if a subscriber always follows the same path to this node, they will go through it over and over again.

Run and stop the automation
Automatic flows allow you to select as many different actions or modules as you want. Once you have designed the complete automatic flow, you will need to click on the Run button to activate the automation, which will be marked as active from that moment on. If you want to edit it, you will need to stop it, make the necessary changes, and reactivate it.
To stop the automation, click on the Stop button.
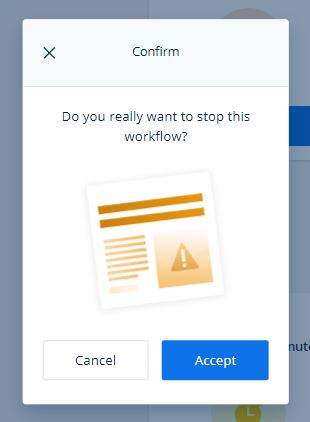
When you stop an automation, you can make any changes you want. When you make the necessary changes and resume the automation, subscribers will reactivate in the state they were in when you clicked Run again.
Statistics of the automation nodes
While the automation is active, you can check the statistics of each of the modules:
- Total: All subscribers who have passed through the node since the creation of the automation
- Current: Subscribers who have passed through the node since the last update (the last time you activated the automation)
- In node: Subscribers who are waiting to enter the selected node

Reports of campaigns sent through automations
You will be able to track all your shipments individually in our Reports with all the data in real time. You can also access directly from the automation by clicking on the Full statistics button of each Send Template module.
You can learn more about how to consult and interpret reports in this article.