
Integrate Acumbamail form in Wordpress
In this article you will find all the options available to integrate your WordPress website with Acumbamail, either by integrating a subscription form created in Acumbamail, or by connecting a form that you have already created on your website with one of your Acumbamail lists.
In this article:
- What options are there to integrate Acumbamail and WordPress?
- Include a form created in Acumbamail in WordPress
- Connect a form created in WordPress with an Acumbamail list
What options are there to integrate Acumbamail and WordPress?
Given a list, Acumbamail allows you to create, design and publish subscription forms associated with it. The first option of integration with WordPress is to include this form on your website. In this way, once integrated, this form will be displayed on your website and the data filled in by users will be synchronized directly with your Acumbamail list.
However, that's not the only option. In case you have already created and designed a form on your website and do not want to replace it with another, it is possible to synchronize the information collected directly with an Acumbamail list.
Include a form created in Acumbamail in WordPress
This section describes the different methods you can follow to integrate and display a subscription form created in Acumbamail on your website created with WordPress.
Acumbamail plugin for WordPress (obsolete regarding forms)
⚠️ The plugin is not compatible with the new block-based widget editor introduced in WordPress 5.8. Therefore this option is only valid for WordPress installations prior to that version. In later versions, installing the plugin is only recommended if you want to use integration with Woocommerce .
The first option is to use the Acumbamail WordPress plugin, which allows you to easily create a widget that loads an Acumbamail form. Simply add the widget to a specific area of your website (sidebar, header, footer, etc.) to load.
If instead of classic WordPress themes you are using a specific plugin for building pages (also known as page builders ), you should check if they are compatible with WordPress widgets. If compatible, you will only have to locate the element or block associated with the Acumbamail widget within the page editor and drag it onto your page (having previously installed the Acumbamail plugin for WordPress).
For example, in the specific case of Elementor, you must locate the "WORDPRESS" section, where the Acumbamail widget is located.

This is the easiest integration option. However, if you are using a specific plugin for page creation that is not compatible with WordPress widgets, if you are using a WordPress version later than 5.7 or want to include more than one form on your website (since the plugin only allows you to integrate one form) you can explore the rest of the options.
HTML element in the WordPress Widgets editor
Since version 5.8, WordPress introduces a new block-based widget editor. If you use this editor to customize the theme of your website, you must follow these steps:
- First you must create your form in Acumbamail and get to step 4, where you will find the integration script generated by Acumbamail.
-
In the WordPress widget editor, within the area where you want to include your form (sidebar, header, footer, etc.), create a new element of type "Custom HTML".

-
In this element you must copy and paste the script (and the div if it is a classic form) generated for your form.

- And that's it! Save your changes and you'll see the form load on your website.


HTML element in plugins to build pages
Page builder plugins (such as Elementor , Gutenberg or Divi , among others) allow you to easily create pages by dragging content blocks. In case your page builder does not support the use of widgets (or you want to integrate more than one Acumbamail form on your website), the alternative is to locate a specific element or block of content that allows you to embed code in the page . It will have a different name depending on the page builder chosen, but they all usually incorporate an element of this type. As a reference, for the page builders mentioned they would be the following:
- Elementor has an HTML element.
- Gutenberg has a code module .
- Divi has a custom HTML block.
- Thrive Theme has a custom HTML block.
The way to perform the integration is very simple:
- First you must create your form in Acumbamail and get to step 4, where you will find the integration script generated by Acumbamail.
- In the WordPress page editor, you must drag the element that allows you to embed code to the position of the page where you want to display the form (only for the classic, since the rest of the forms have a predetermined position and it will not matter where the element is located within the page). Within the element, you can copy and paste the generated script in Acumbamail (and the div element if it is a classic form). In the page builder preview the form will not appear, but when you publish the changes, you will see how the Acumbamail form does load on the page.
The following image shows an example of configuration with the "HTML element" of Elementor.

Third-party plugin such as Insert Headers and Footers
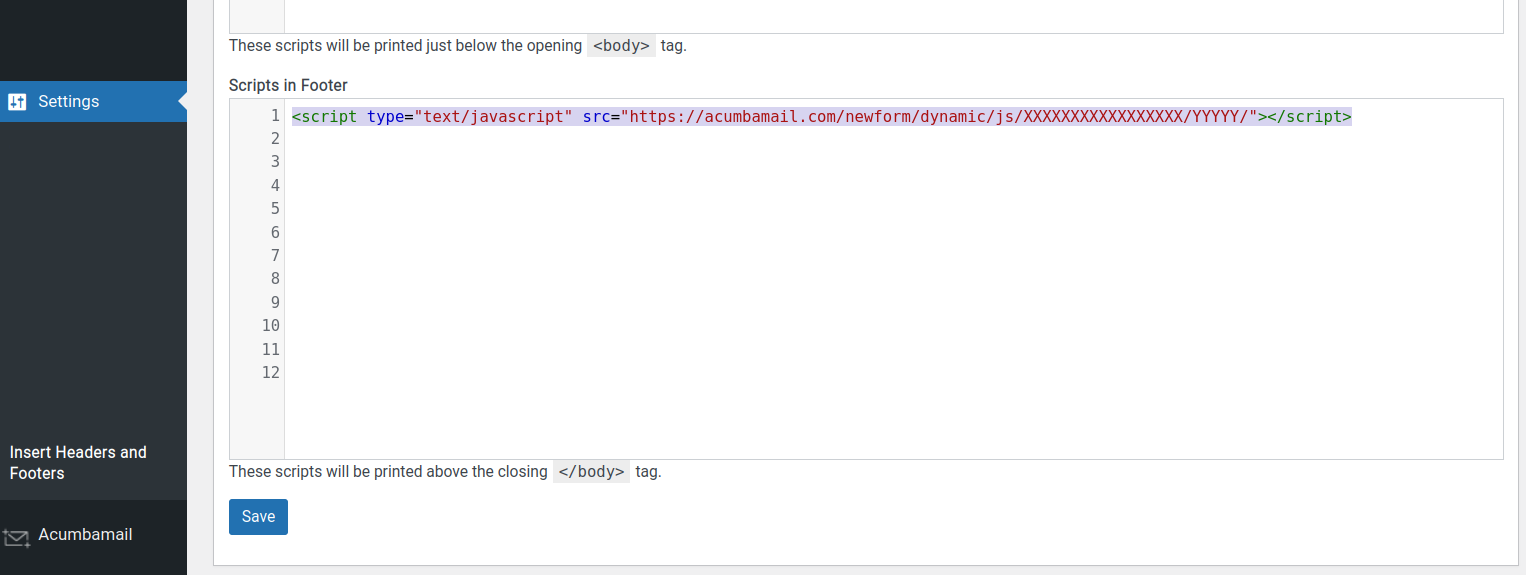
Another alternative is to install an Insert Headers and Footers type plugin. With these you can easily incorporate into your website the script necessary to load Acumbamail popup, exit intent, bar or side forms. This script is available in step 4 when creating your form in Acumbamail. Among all the existing plugins, we recommend the following:
- Insert Headers and Footers to easily include the Acumbamail loading script in the footer part, or
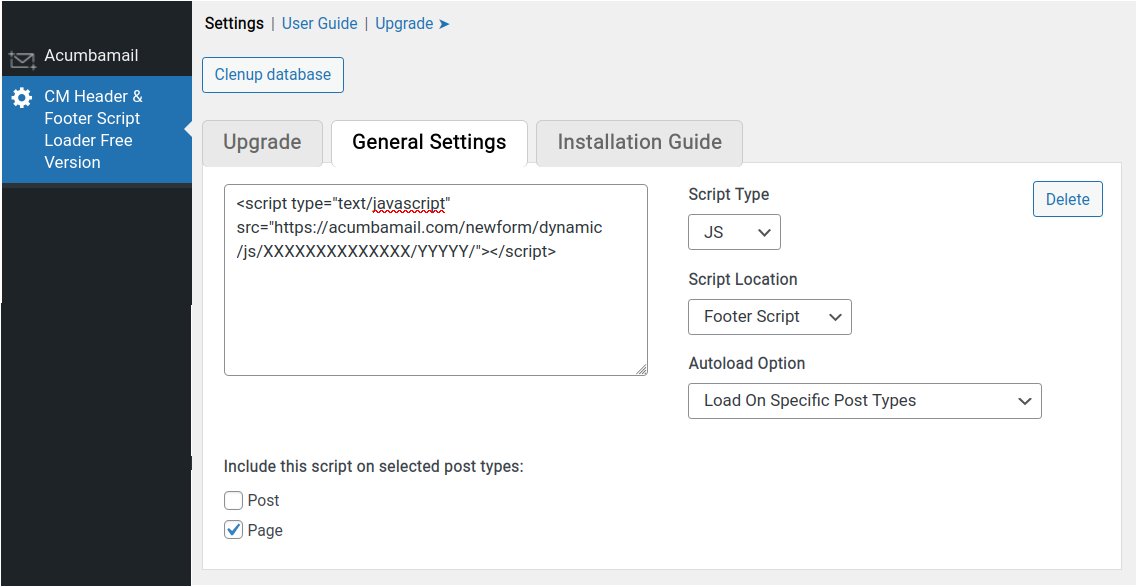
- Header and Footer Script Loader to be able to include the loading script only on selected pages, also in the footer part.
In the case of the classic form (which requires also including an HTML element of type div) or in the case of the popup that opens when you click a button (which requires adding the form-trigger-acm attribute to that button on your page), it would also be necessary to add a small fragment of additional Javascript code that well, insert that div into the page in the desired position, or add that attribute to the button. Although it can be achieved with a few lines of code, if you do not have technical knowledge we recommend you review the rest of the options.
Connect a form created in WordPress with an Acumbamail list
This section describes the alternatives available to synchronize with an Acumbamail list the information entered in a form created on your WordPress page.
Connect through external integration services
Acumbamail is available in the following application interconnection services: Zapier, Integrately, Pabbly Connect or KonnectzIT.
That is why if you are a user of any of these services and the plugin you are using to build your website offers options for integrating your forms with these services through Webhook ( Zapier is usually the most common), you will only have to configure that form integration through said connector.
In this article you can review in detail how to perform the configuration through Zapier.
Connect via incoming webhooks
Apart from the API, in Acumbamail you can create incoming webhooks, which allow you to execute a series of actions in Acumbamail from an external system in the simplest way: simply by calling a URL.
If the plugin you are using to build your website offers options for integrating its forms through Webhook you will only have to:
- First set up an inbound webhook in Acumbamail to add subscribers to your list.
- Once created, it will generate a URL that you will have to copy when configuring the integration option through webhook of the form created with the page builder.
- You just have to keep in mind that the information of the form is being sent in JSON format with one of these two "content-types": application/json or application/x-www-form-urlencoded, which are the ones with which Acumbamail is compatible.
As an example, for the specific case of Elementor, given a form, you must look for the Option of Actions after submit and within this configure the Option of Webhook.

If you are not sure how to configure the incoming webhook in Acumbamail, we recommend following these steps:
- First obtain a testing URL by visiting the website https://webhook.site . For now, copy the URL and keep the site open.
- Configure the output webhook in Wordpress. When creating it, it will ask you to enter a URL, which is the URL to which it will send the form information. Here you must enter the URL that you obtained in the first step.
- Submit your form so that at https://webhook.site you can see the exact information that is sent from your Wordpress to the URL.
- Once you know the information sent (or "entry payload") you can now create the entry webhook in Acumbamail. More information here .
- Once configured, the Acumbamail input webhook will provide you with a custom URL. To finish the configuration, you must go back to the output webhook configured in Wordpress and replace the testing URL you entered with the Acumbamail URL. In this way, you will have completed the configuration and the next time the form is filled out, the data will be sent and synchronized in Acumbamail.
Connect using the Forms plugin: 3rd-Party Integration
This method is only valid if you have created your form with one of the following WordPress plugins: Ninja Forms, Contact Form or Gravity Forms.
To use this method, the first thing to keep in mind is that, even if you are not showing it on your page, you will still have to create the form in Acumbamail (within the list of interest). You won't have to worry about the design, as it's irrelevant. You will only have to add to this form the same fields that you have in your WordPress form (and that you will have to have previously added as fields from the list itself). This is required to enable an integration URL that you will need when you configure the plugin.
Once you have the form ready in Acumbamail, with the help of the Forms: 3rd-Party Integration plugin you can connect the fields of your form in Acumbamail with the fields of your form in WordPress, so that when a user fills in the form, the information will be synchronized with the Acumbamail form. For more details, you can consult the specific article where the integration used by the 3rd-Party Integration plugin explains.