
WhatsApp Chatbot
With the WhatsApp chatbot, you can automatically reply to messages your contacts send you: provide information, ask questions and save their answers, or hand the conversation over to someone on your team when needed. In this article, we explain how to create your automations, test them, publish them, and check their results.
In this article:
3. The editor
5. Publishing
7. Bot settings
10. Frequently asked questions
Accessing the feature
The chatbot is available to users with a Pro or Enterprise plan who have their WhatsApp Business account connected to Acumbamail. If you haven’t connected it yet, follow the steps in our WhatsApp article.
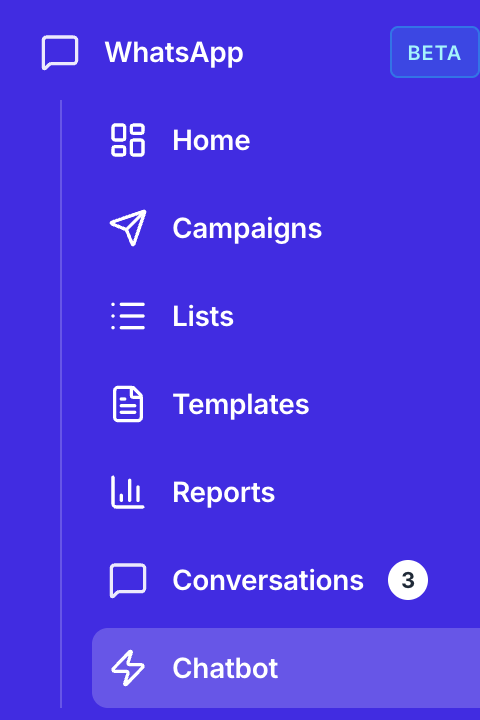
You’ll find it in the WhatsApp section of the main menu, under Chatbot.
Creating an automation
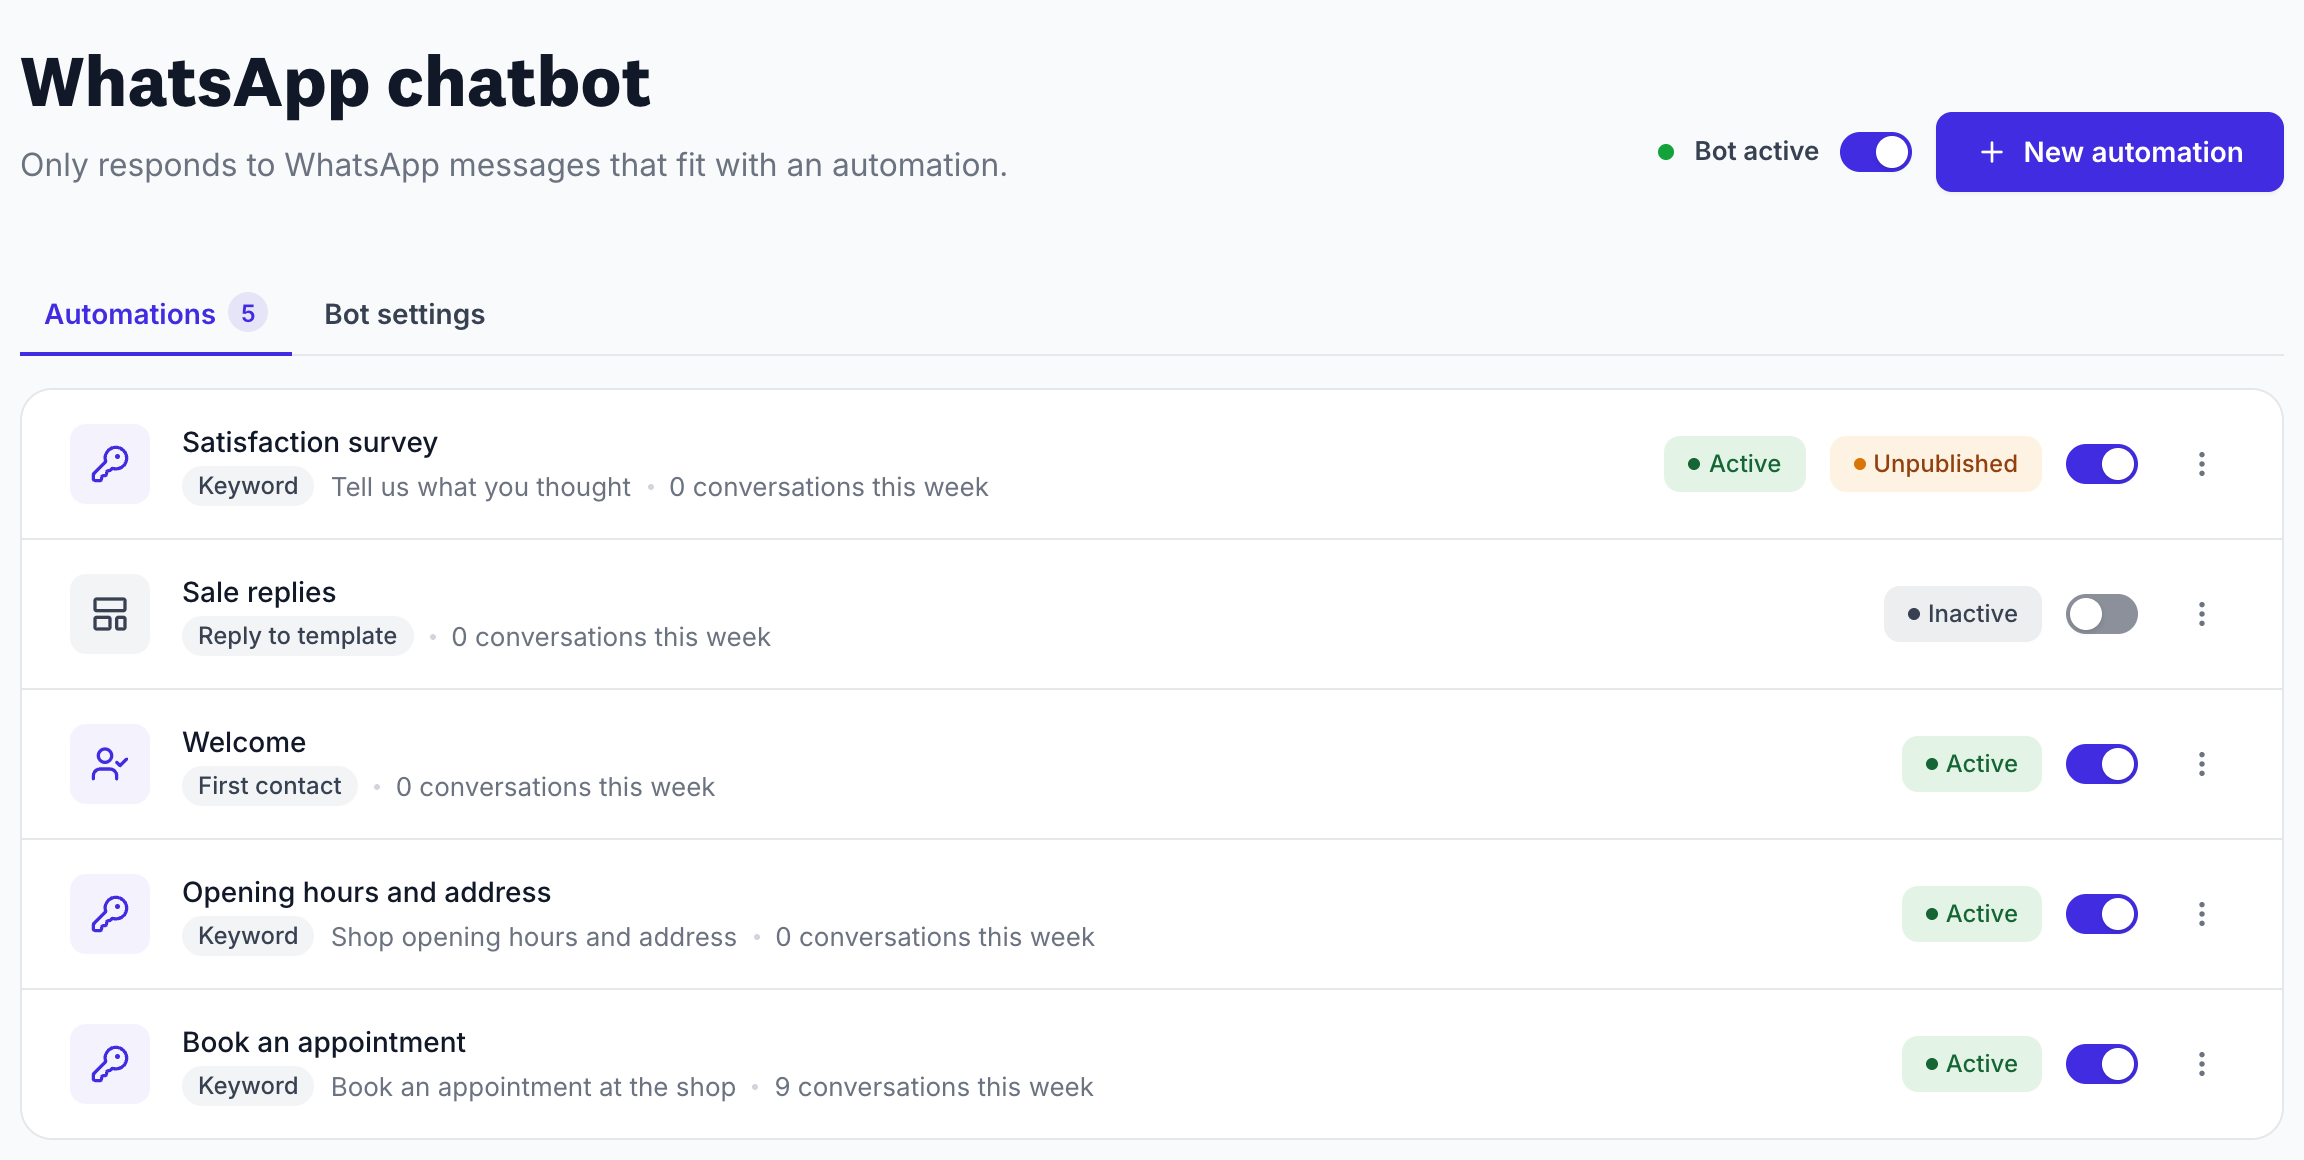
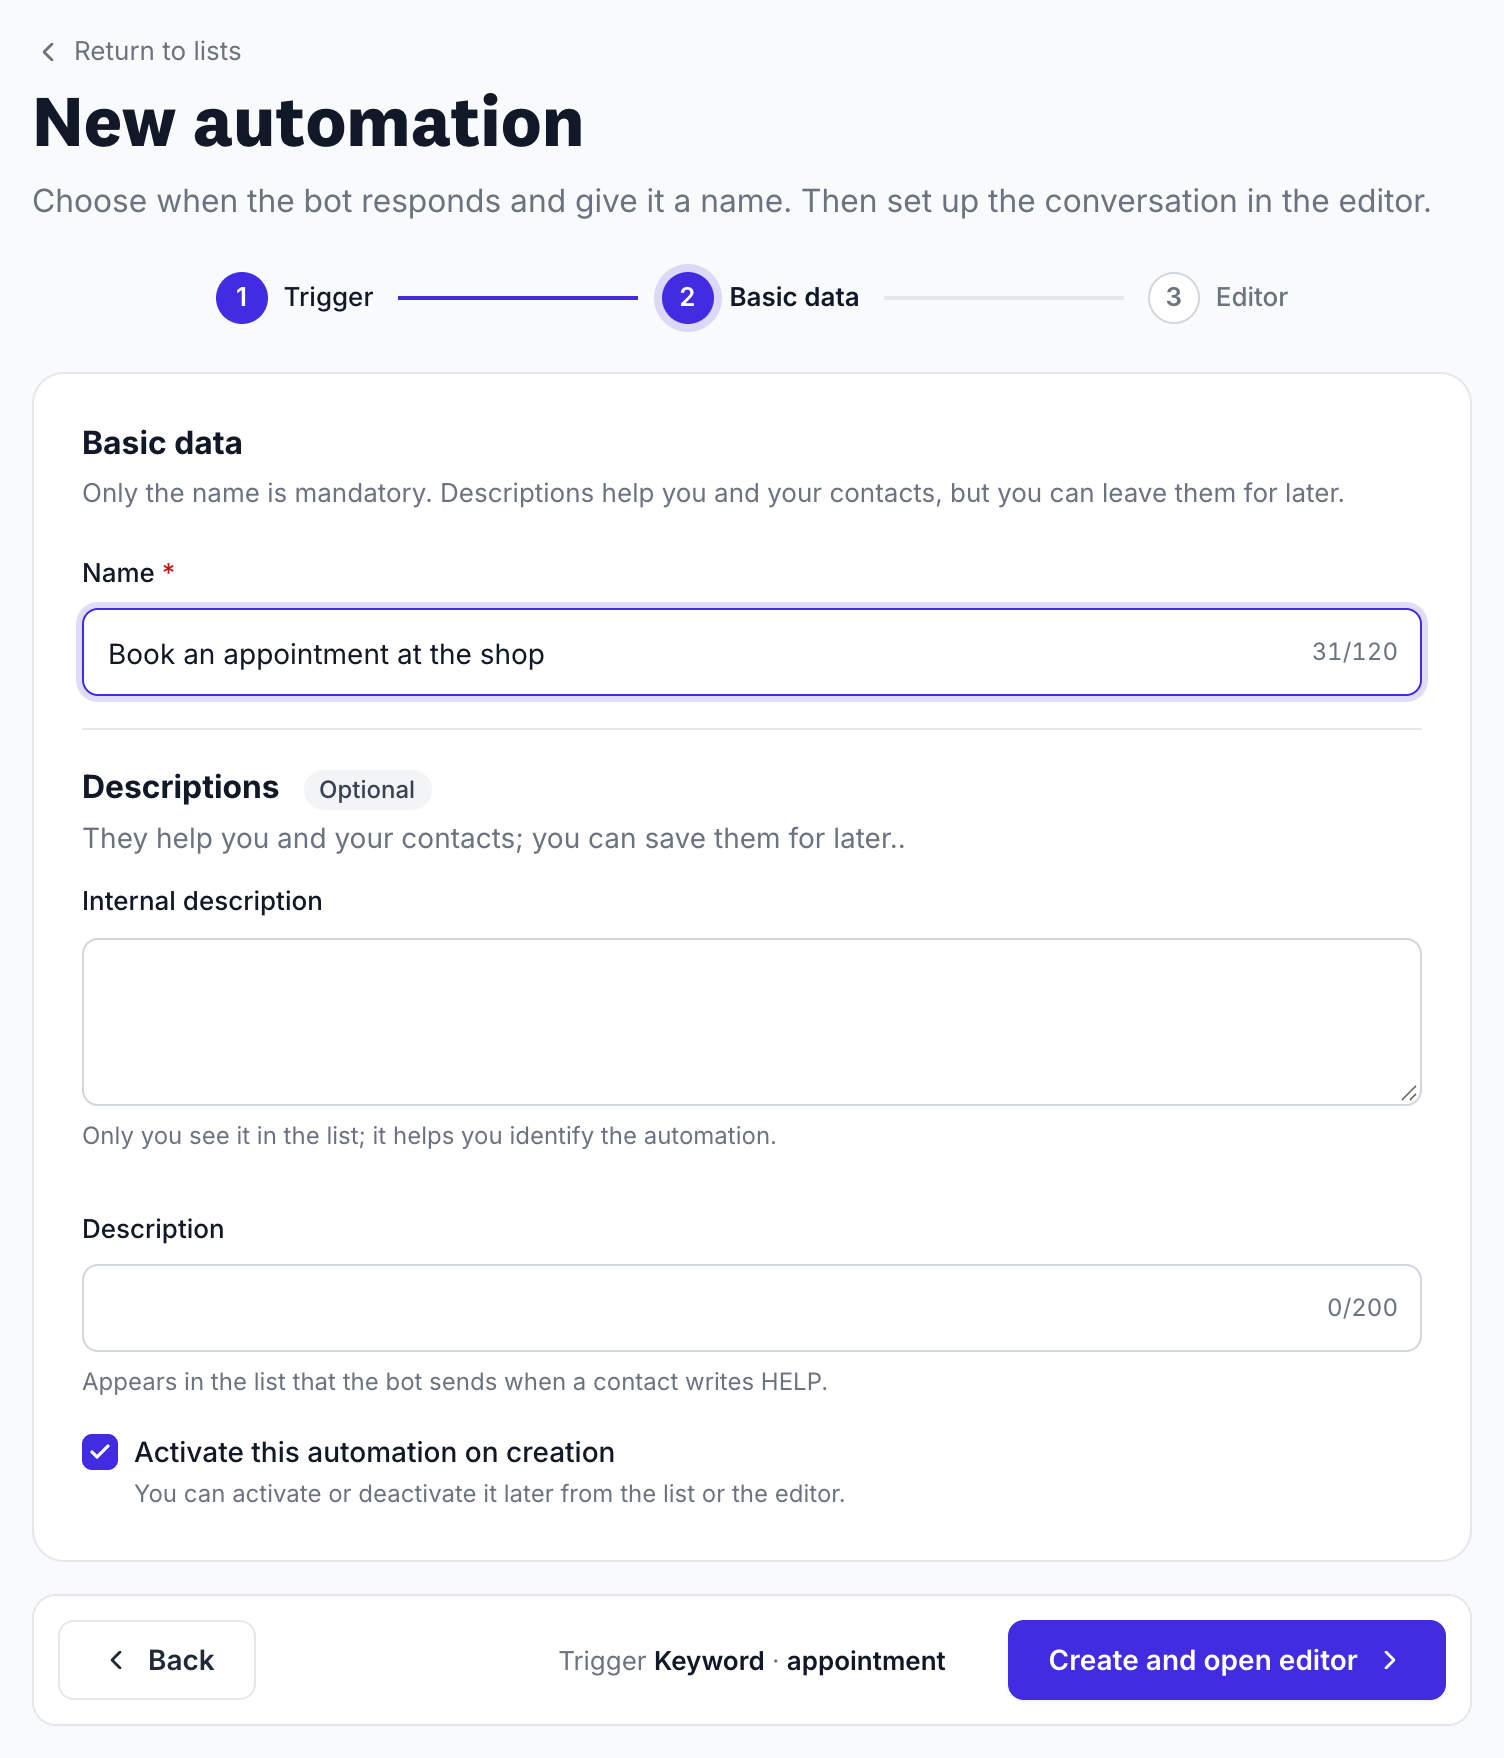
Each conversation handled by the chatbot follows an automation: a series of steps that start when a trigger is met. You can have as many automations as you want, for example one to provide opening hours and another to book appointments.
From Chatbot, click the New automation button. The wizard has three steps: Trigger, Basic details, and the Editor, where you build the conversation. If this is your first automation, you’ll also see a summary of how the chatbot works.
Step 1: Trigger
Choose when the automation is activated:
- Keyword: starts when the contact writes one of the words you specify, anywhere in their message. It is not case- or accent-sensitive, but the word must be complete: if it is appointment, it will respond to “I want to book an APPOINTMENT”, but not to “I have several appointments”.
- First contact: starts with the first message a number sends you. It is only activated once per contact.
- Reply to template: starts when the contact replies to a campaign message that used the template you choose. The dropdown only shows your templates approved by Meta.
If one of the keywords is already used by another active automation, the wizard warns you, although it lets you continue. If both are active, the one created first always responds.
Step 2: Basic details
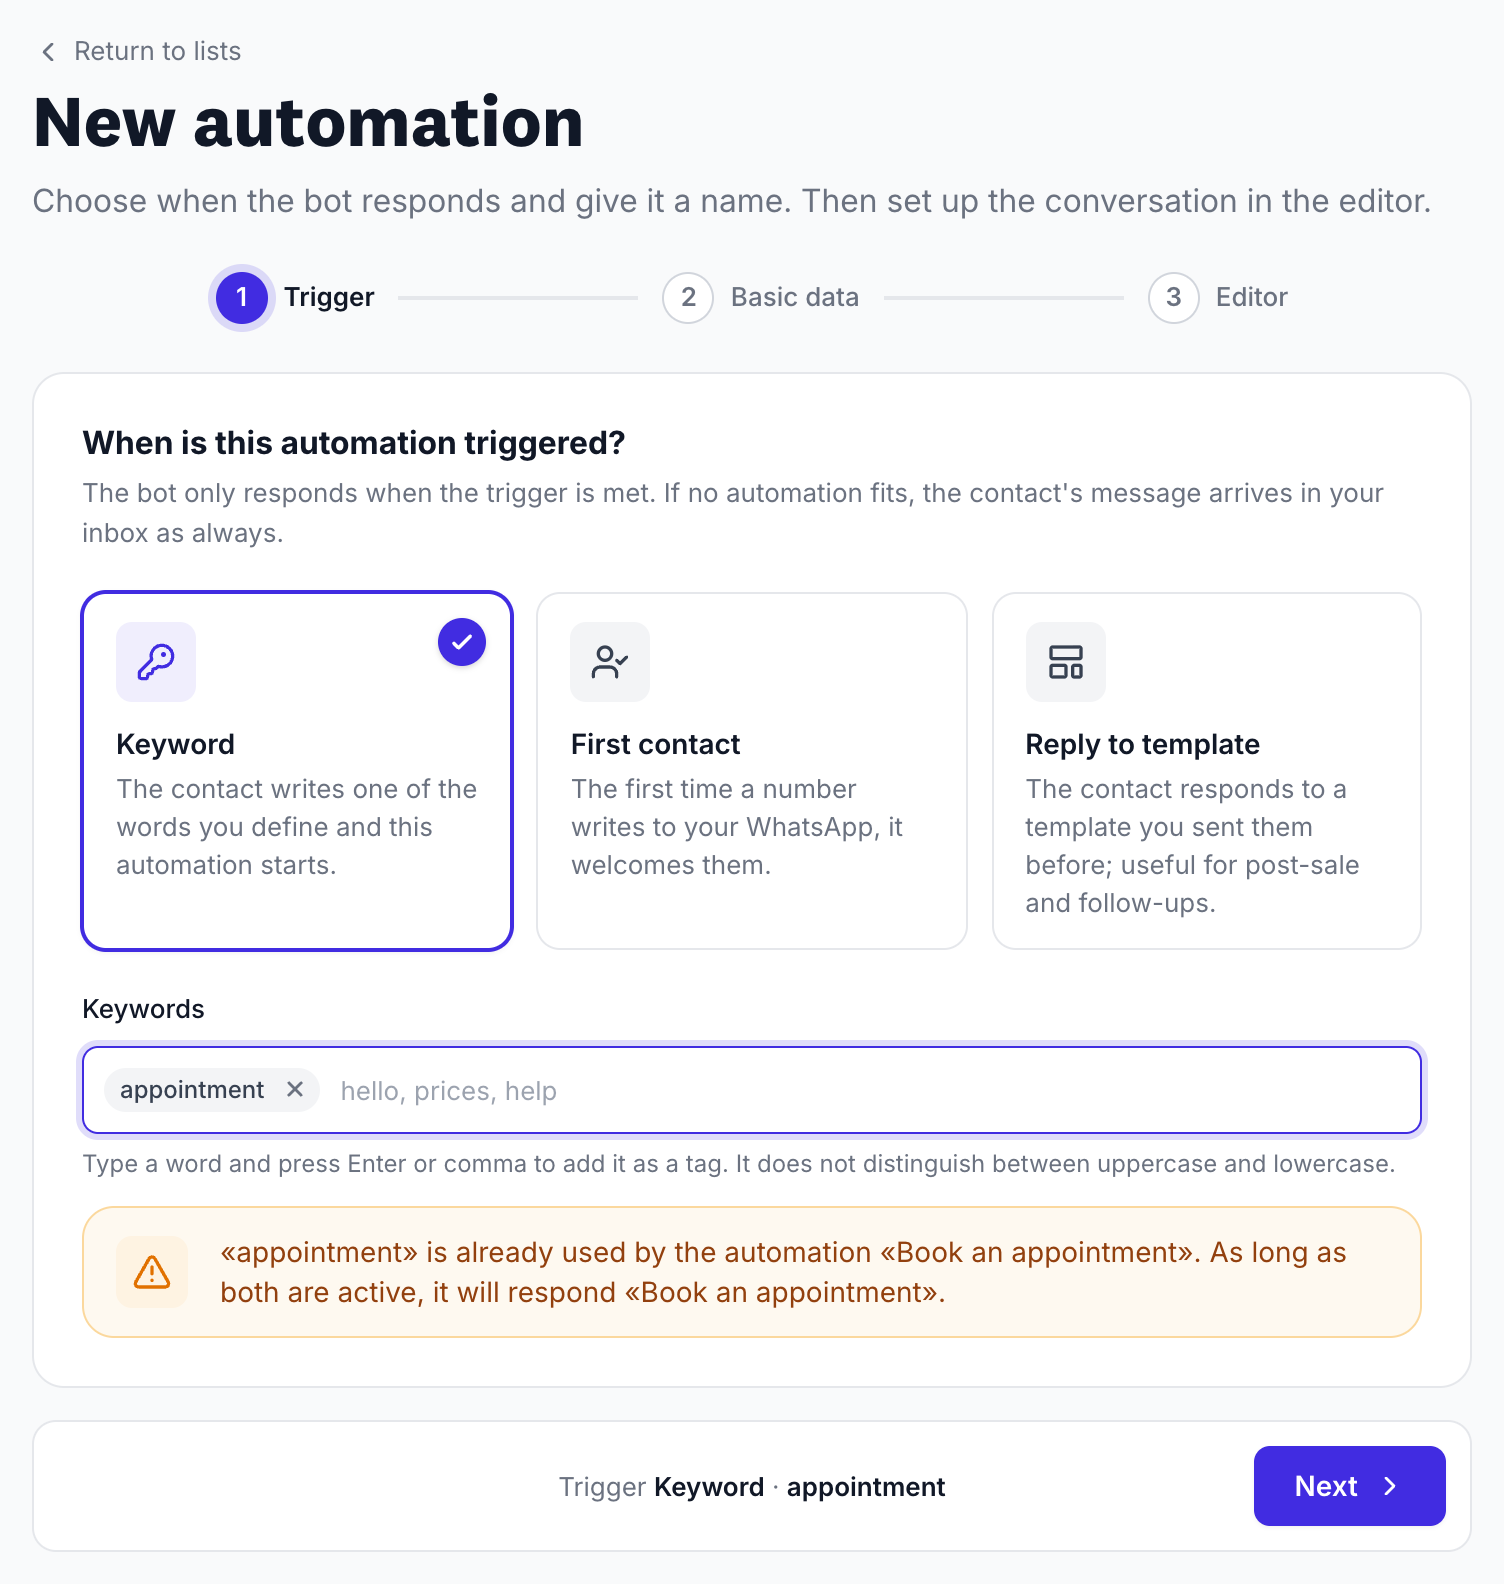
Give it a Name that identifies it. Optionally, you can add:
- Internal description: only you can see it.
- Public description: this is the text the contact will see next to the keyword in the help list (see Bot settings).
Click Create and open editor.
The editor
In the editor, you build the conversation step by step. Under each step, there is a + button to add the next one, which is connected automatically; between two steps, the + inserts one in the middle. Steps that split into several paths, such as Branch or Validate date and time, have a + for each output. When you click it, you choose the step type by category or using the search box. From the editor header, you can also change the automation name and keywords.
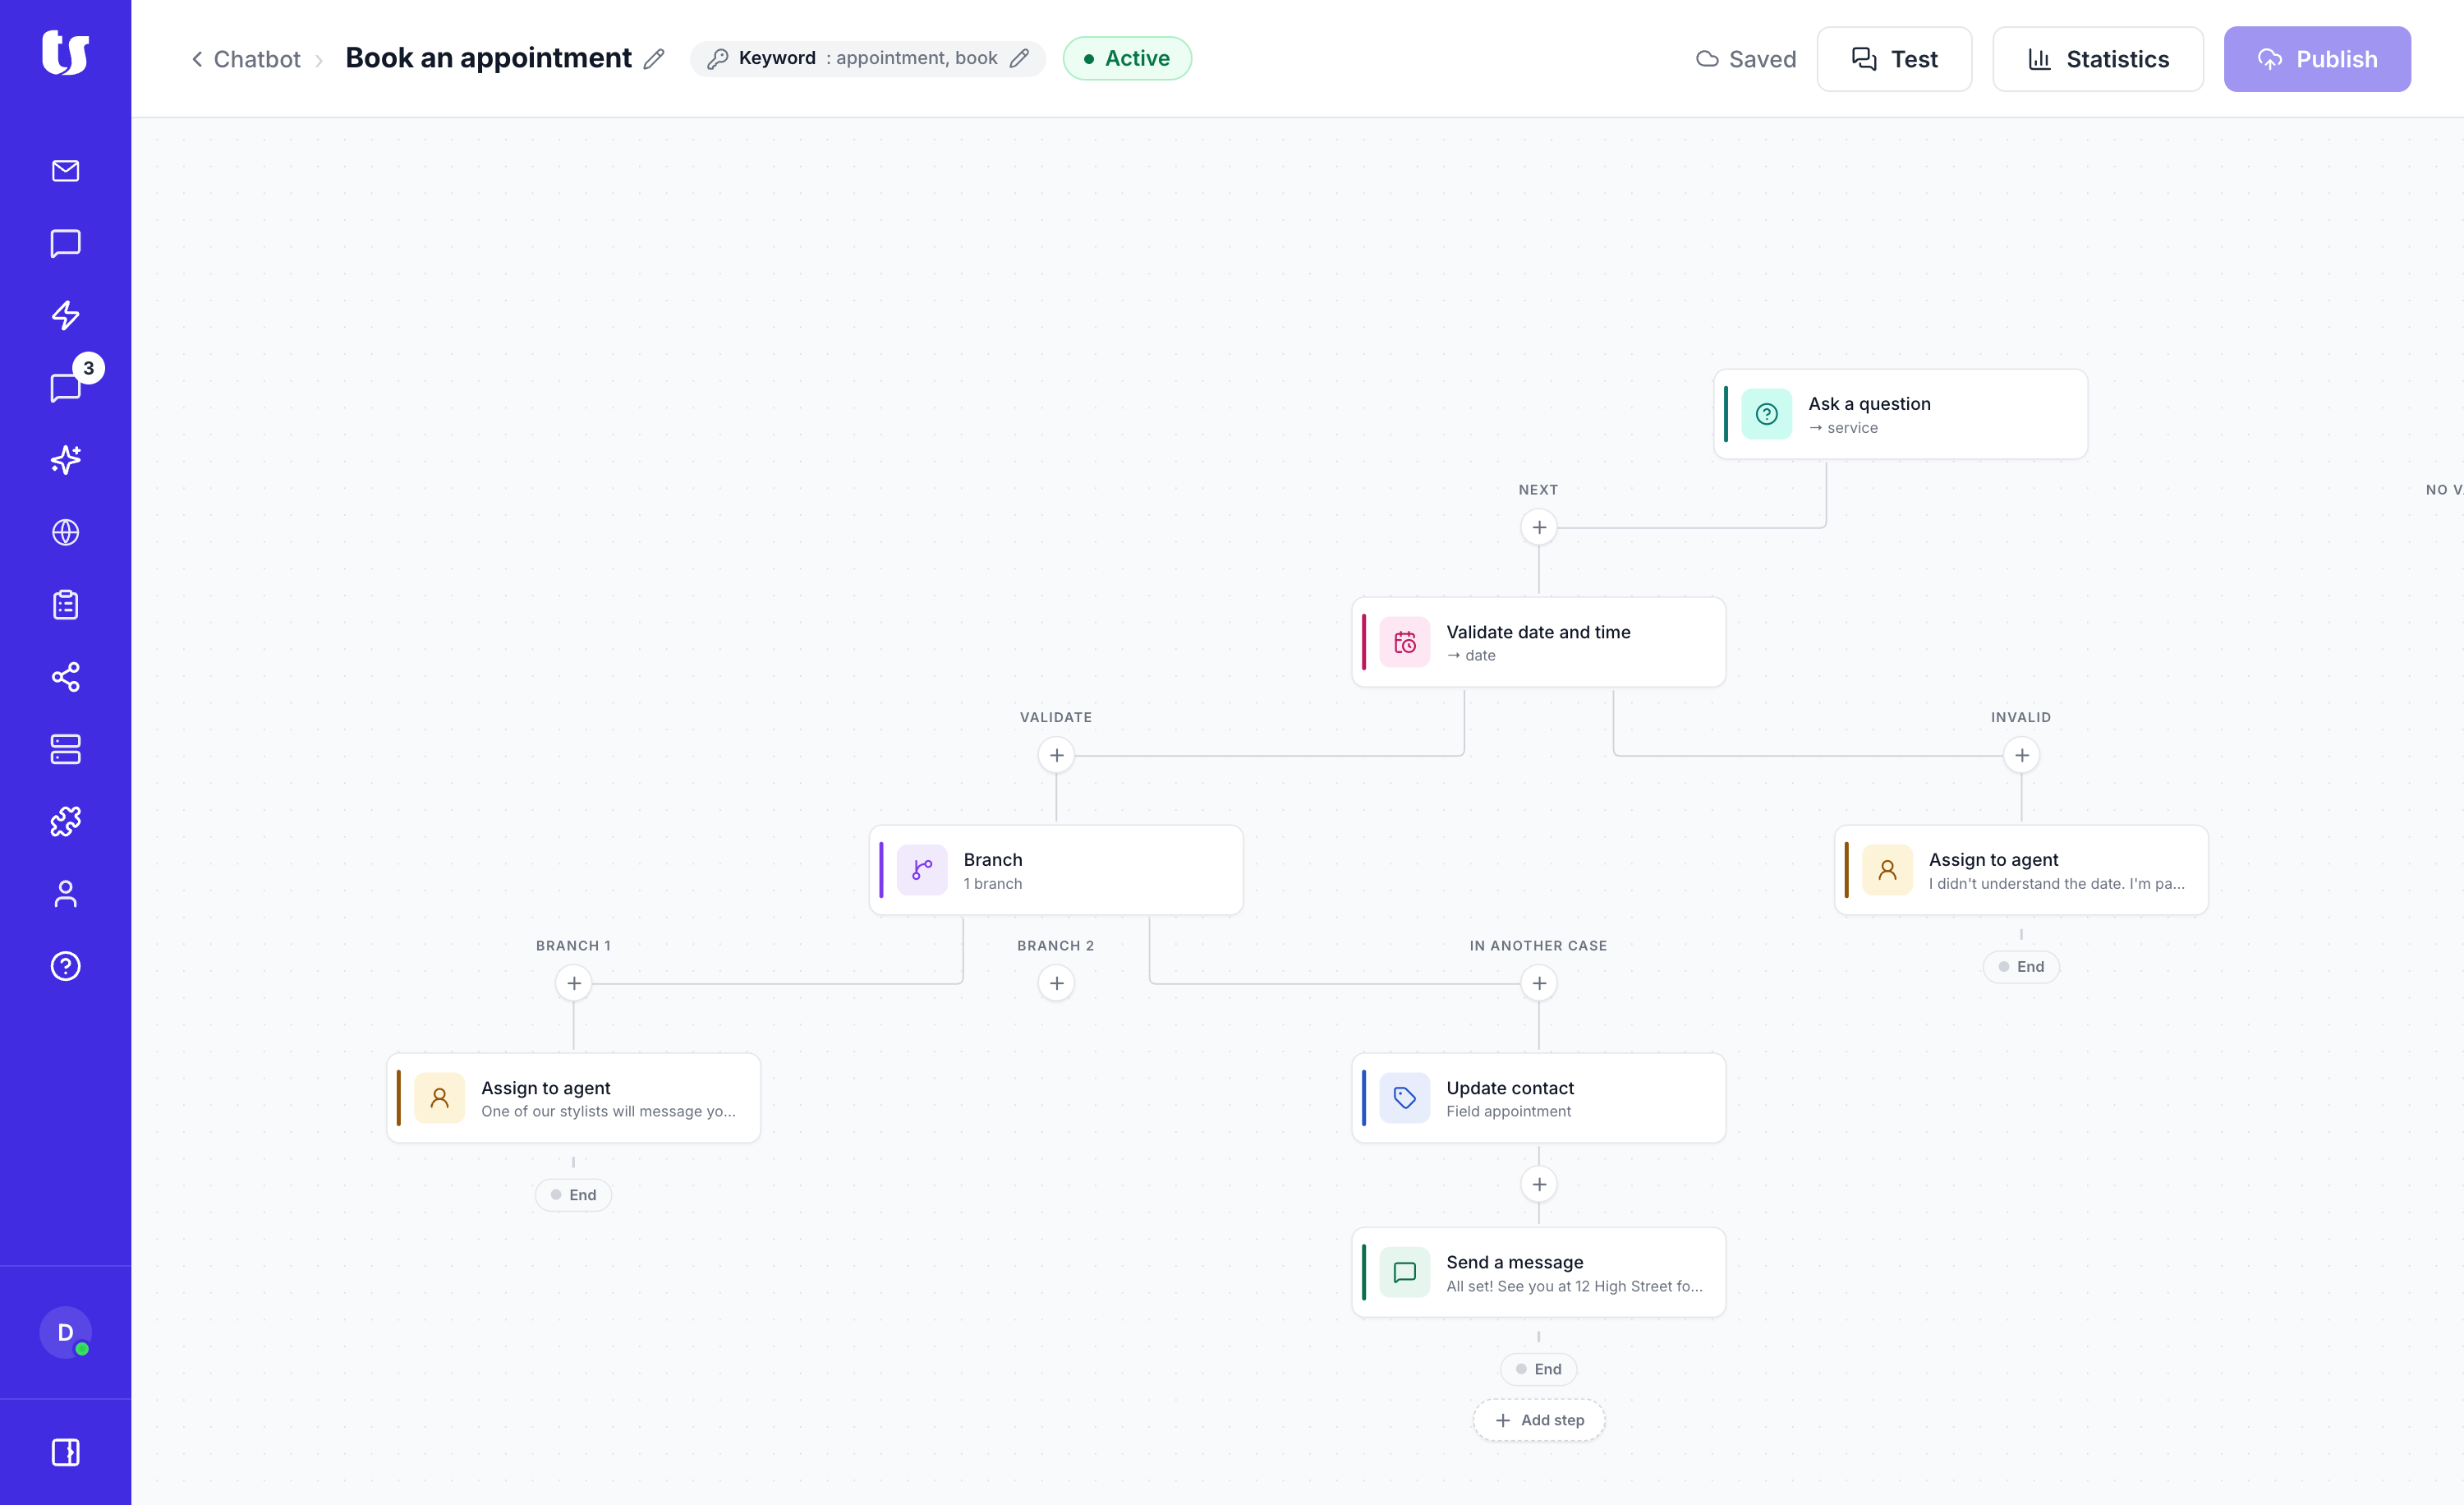
Step types
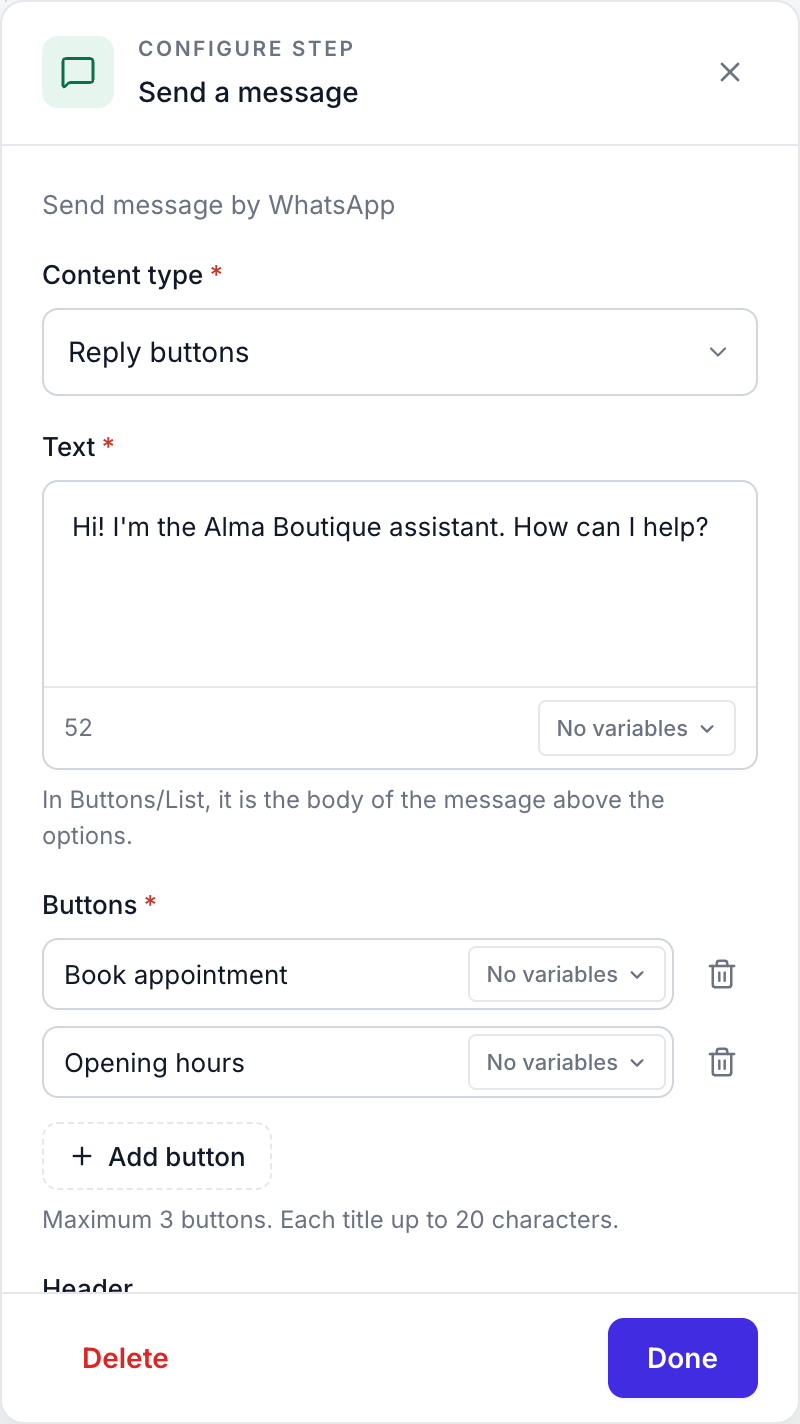
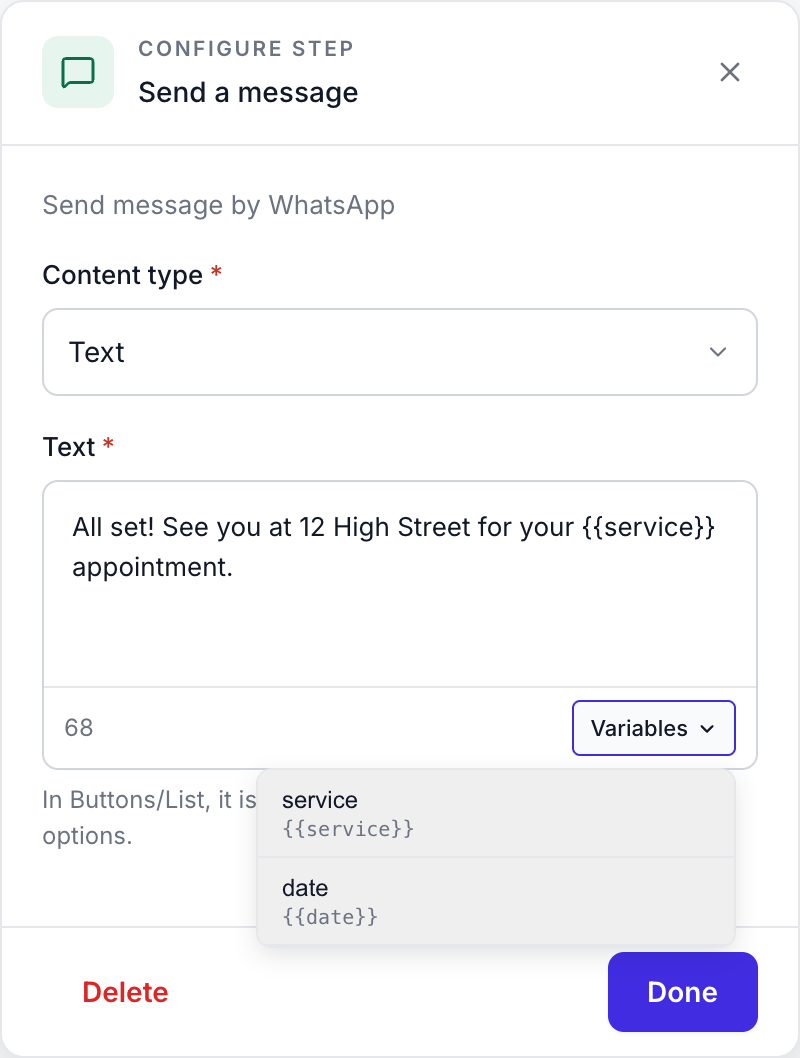
Send message. Sends a message to the contact. You can choose the content type:
- Text.
- Image, video, audio, or document: enter the link to the file, which must be a public address starting with http:// or https://. You can add text to accompany the file (except for audio).
- Reply buttons: up to 3 buttons, with a maximum of 20 characters each.
- List: up to 10 options, which the contact sees when they tap the list button.
- Template: one of your templates approved by Meta.
Messages with buttons and lists can also include a header and footer of up to 60 characters.
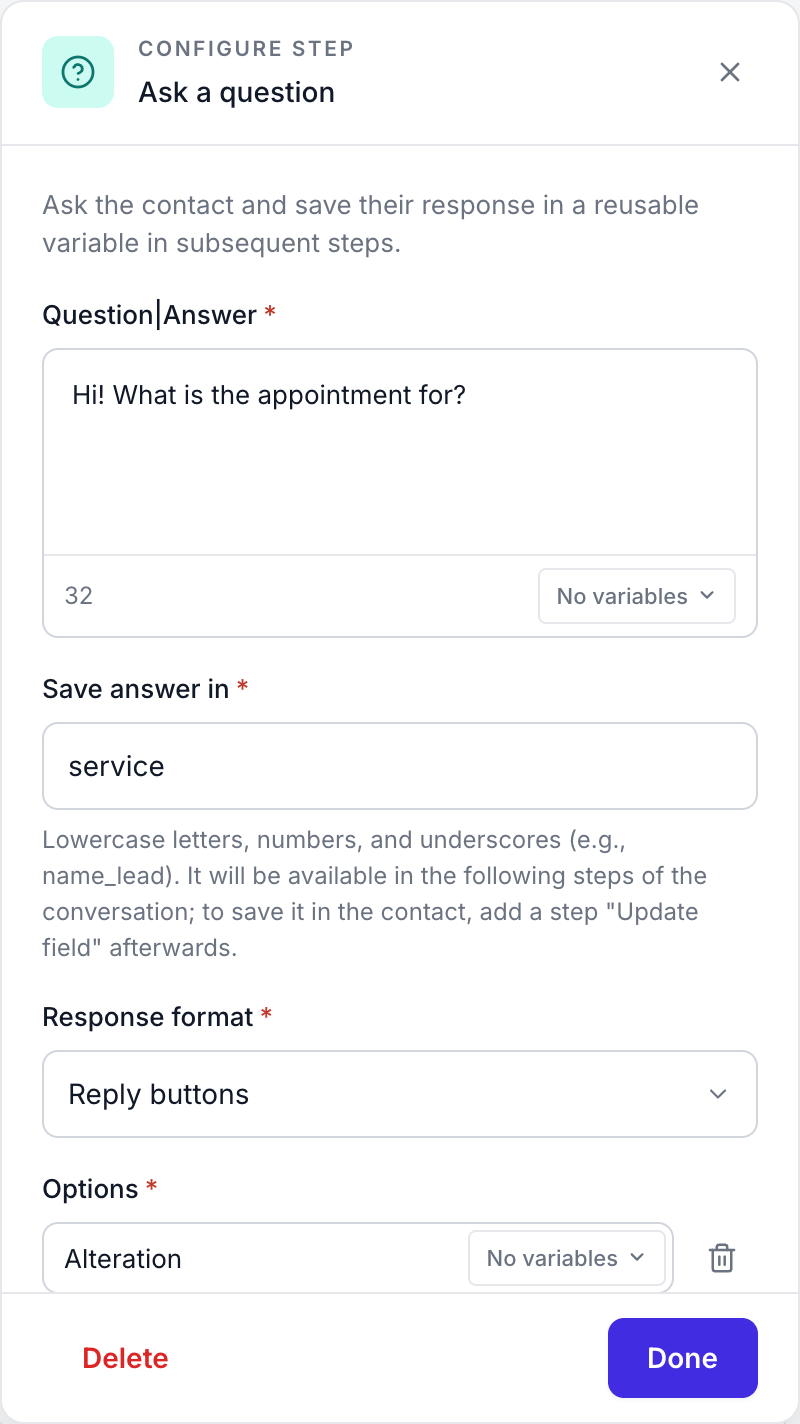
Ask a question. Sends a question and waits for the contact’s answer, which is saved in a variable (see Variables). You can configure:
- Answer format: free text, reply buttons, or list.
- Retries if the answer doesn’t match: with buttons or a list, how many times it asks again if the contact writes something that is not one of the options, and what it says when asking again.
- Answer waiting time: from 1 hour to 7 days (24 hours by default). If the contact doesn’t respond within that time, the conversation is closed.
The question has two outputs: Next, when the answer is valid, and No valid answer, when the retries run out.
Validate date and time. Asks for a date, a time, or both, and checks that the contact writes it in a valid format (for example, 25/12/2026 or 17:30). As with questions, you can specify how many times it asks again if the format is not valid and the answer waiting time. It has two outputs: Valid and Invalid.
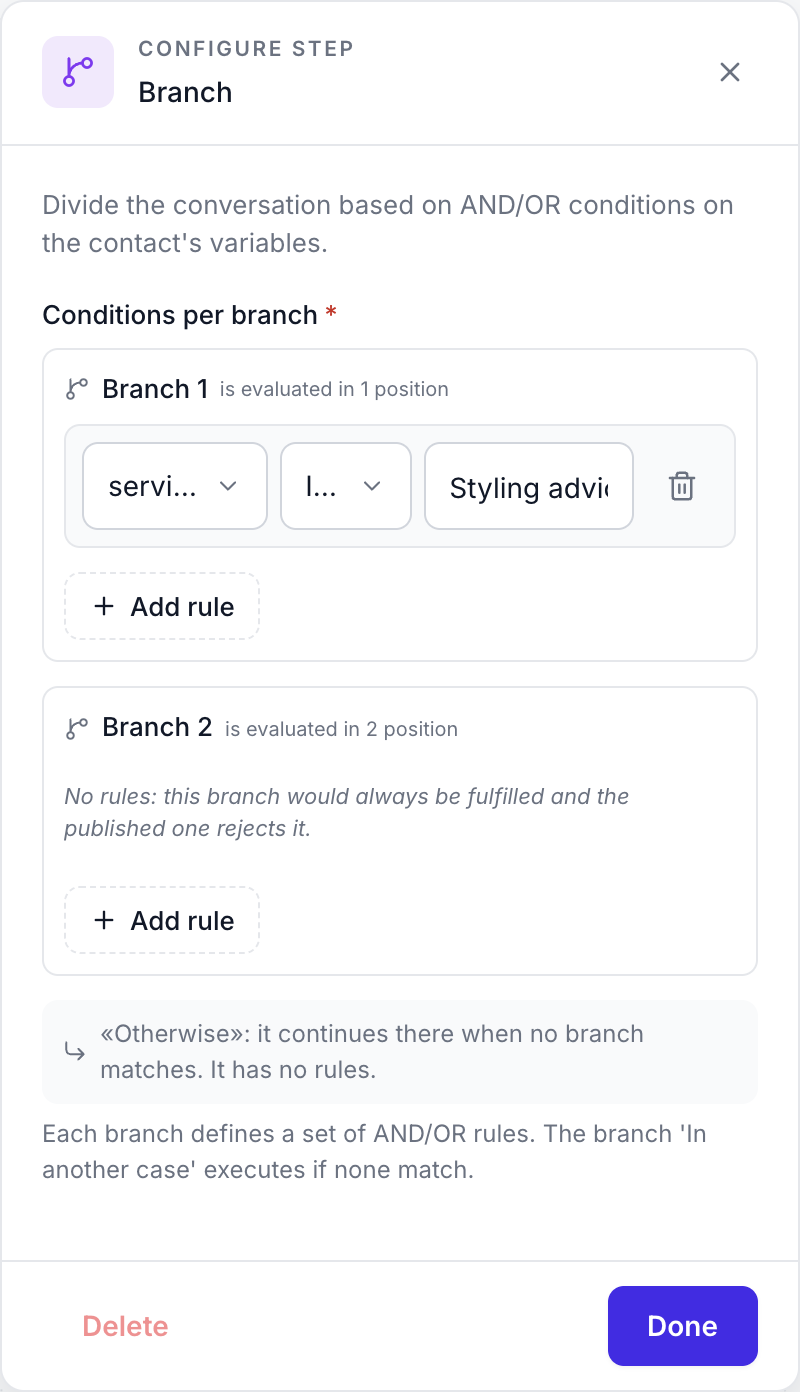
Branch. Takes the conversation down one path or another based on the saved answers. Each branch has its own rules (Is equal to, Contains, Is one of, Is empty…); the first branch that matches is followed and, if none match, the Otherwise output is used.
Update contact. Saves a piece of information in the contact’s profile: their name or a custom field, with a fixed value or with the answer they gave in a previous step.
Assign to agent. Ends the automation and leaves the conversation waiting for someone on your team in Conversations. Optionally, you can send a message to the contact, such as “Someone will be with you shortly”.
Variables
The answers to the Ask a question and Validate date and time steps are saved in a variable with the name you enter in Save answer in (lowercase letters, numbers, and underscores only).
To use an answer in a later message, click the Variables button in the text field: it will be inserted as {{name}} and the contact will see what they answered. Only variables that exist in all paths leading to that step are offered.
Variables only last for the duration of the conversation. If you want to save the data in the contact’s profile, add an Update contact step.
Autosave
Changes are saved automatically as soon as you stop typing; in the header you’ll see Saving… and Saved. What you save is a draft: the chatbot won’t use it until you publish it.
Testing the automation
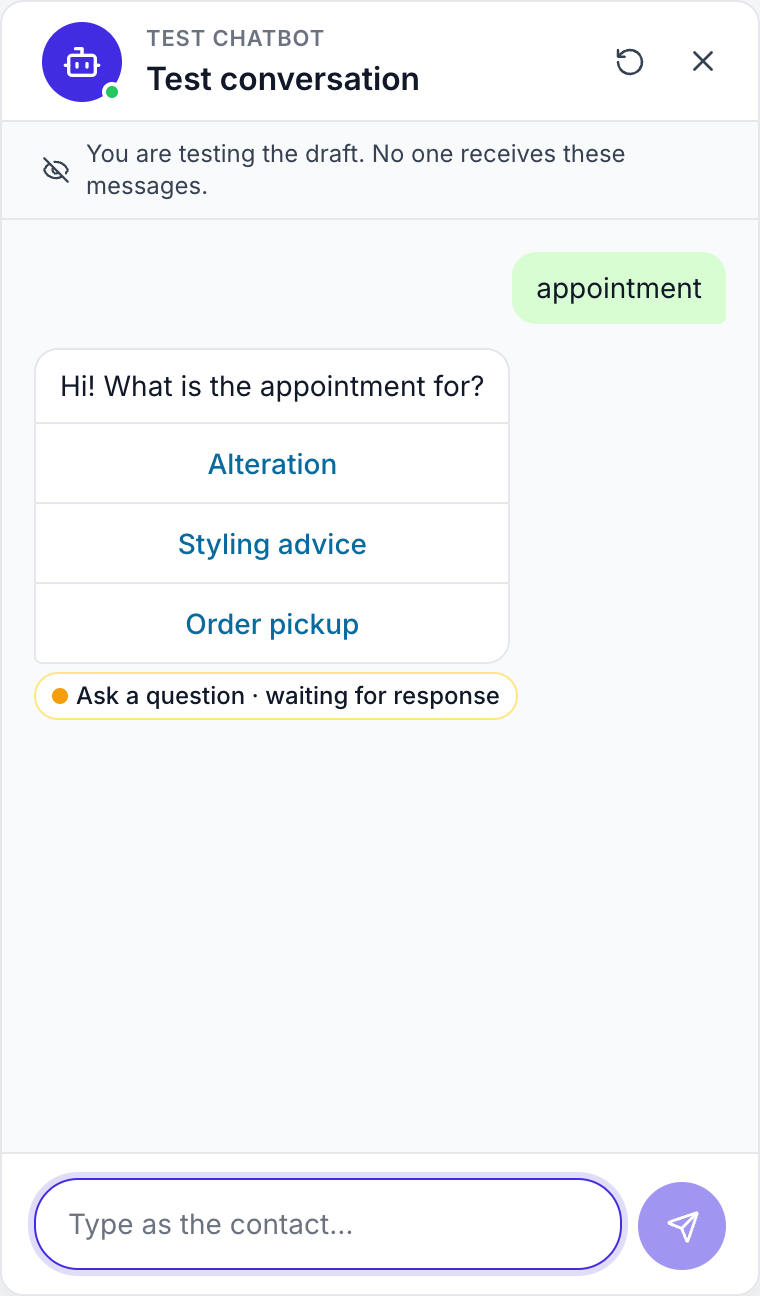
Before publishing, click Test in the editor header to chat with your draft as if you were a contact. It is a simulation: no real message is sent and nothing is saved.
Write as the contact would or, if the automation starts with a keyword, click Start with “word”. Each chatbot reply indicates which step sent it; when you click it, the editor takes you to that step.
The test uses the saved draft: if you have just made changes, wait until you see Saved in the header. It always starts with the first step of the automation, so it does not check the trigger or the commands in Bot settings. Use Start over to repeat it.
Publishing
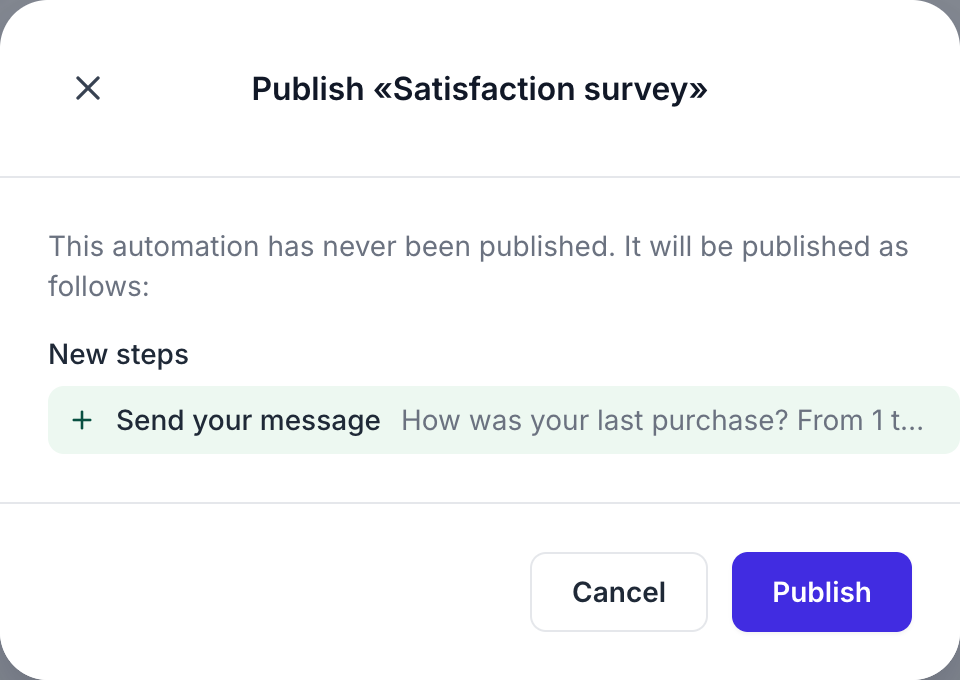
When the automation is ready, click Publish in the editor header; the first time, you can also do it from its menu in the list. You’ll see a summary of the new, modified, and deleted steps. If there is anything preventing publication (a message with no text, a question with no variable, a step that cannot be reached…), it will appear in the Before publishing, you need to resolve this list with the affected step.
You can keep editing a published automation: changes are not applied until you publish again, and the Publish button is only enabled when there are pending changes. Conversations that are in progress at that time finish with the previous version; new ones use the latest version.
Activating the chatbot
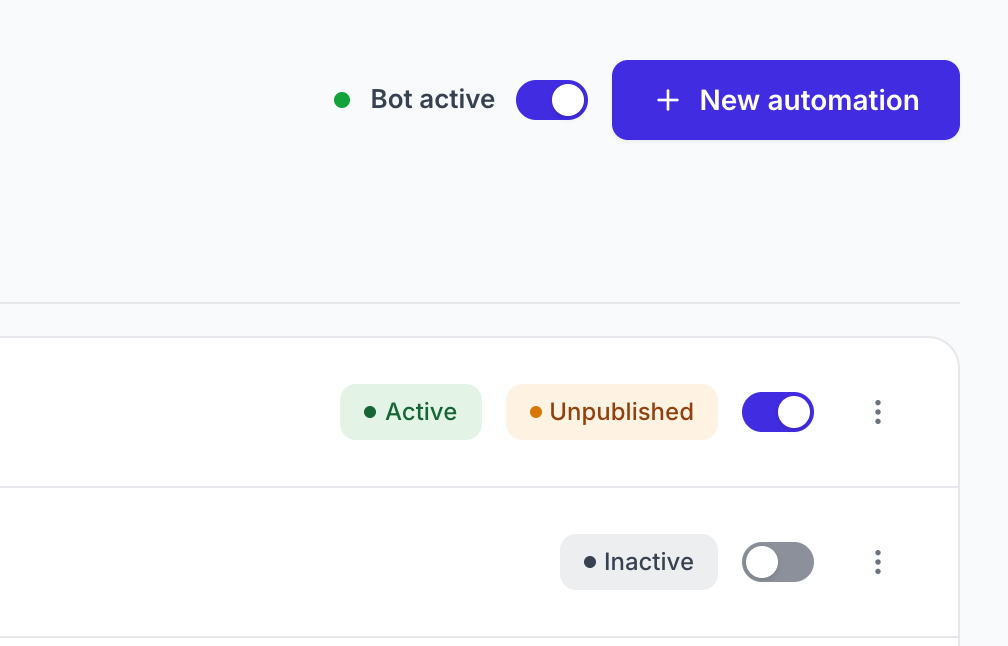
In addition to publishing each automation, the chatbot has a general switch at the top of the list, which appears as soon as you create your first automation. It is off at first: when you want it to start replying, turn it on and you’ll see Bot active. While it is off, the messages you receive are not answered and conversations remain waiting for a person in Conversations.
Each automation also has its own switch in the list, with the status Active or Inactive. You can deactivate one without deleting it, and the change is applied immediately, without needing to publish again.
When a person replies, the chatbot steps aside. If someone on your team replies in a conversation, either from Conversations or from their phone with the WhatsApp Business App, the chatbot closes any automation it had in progress with that contact and stops intervening in that conversation for 24 hours. Each new reply from your team renews that period. During that time, it only handles the help, unsubscribe, and resubscribe commands.
Bot settings
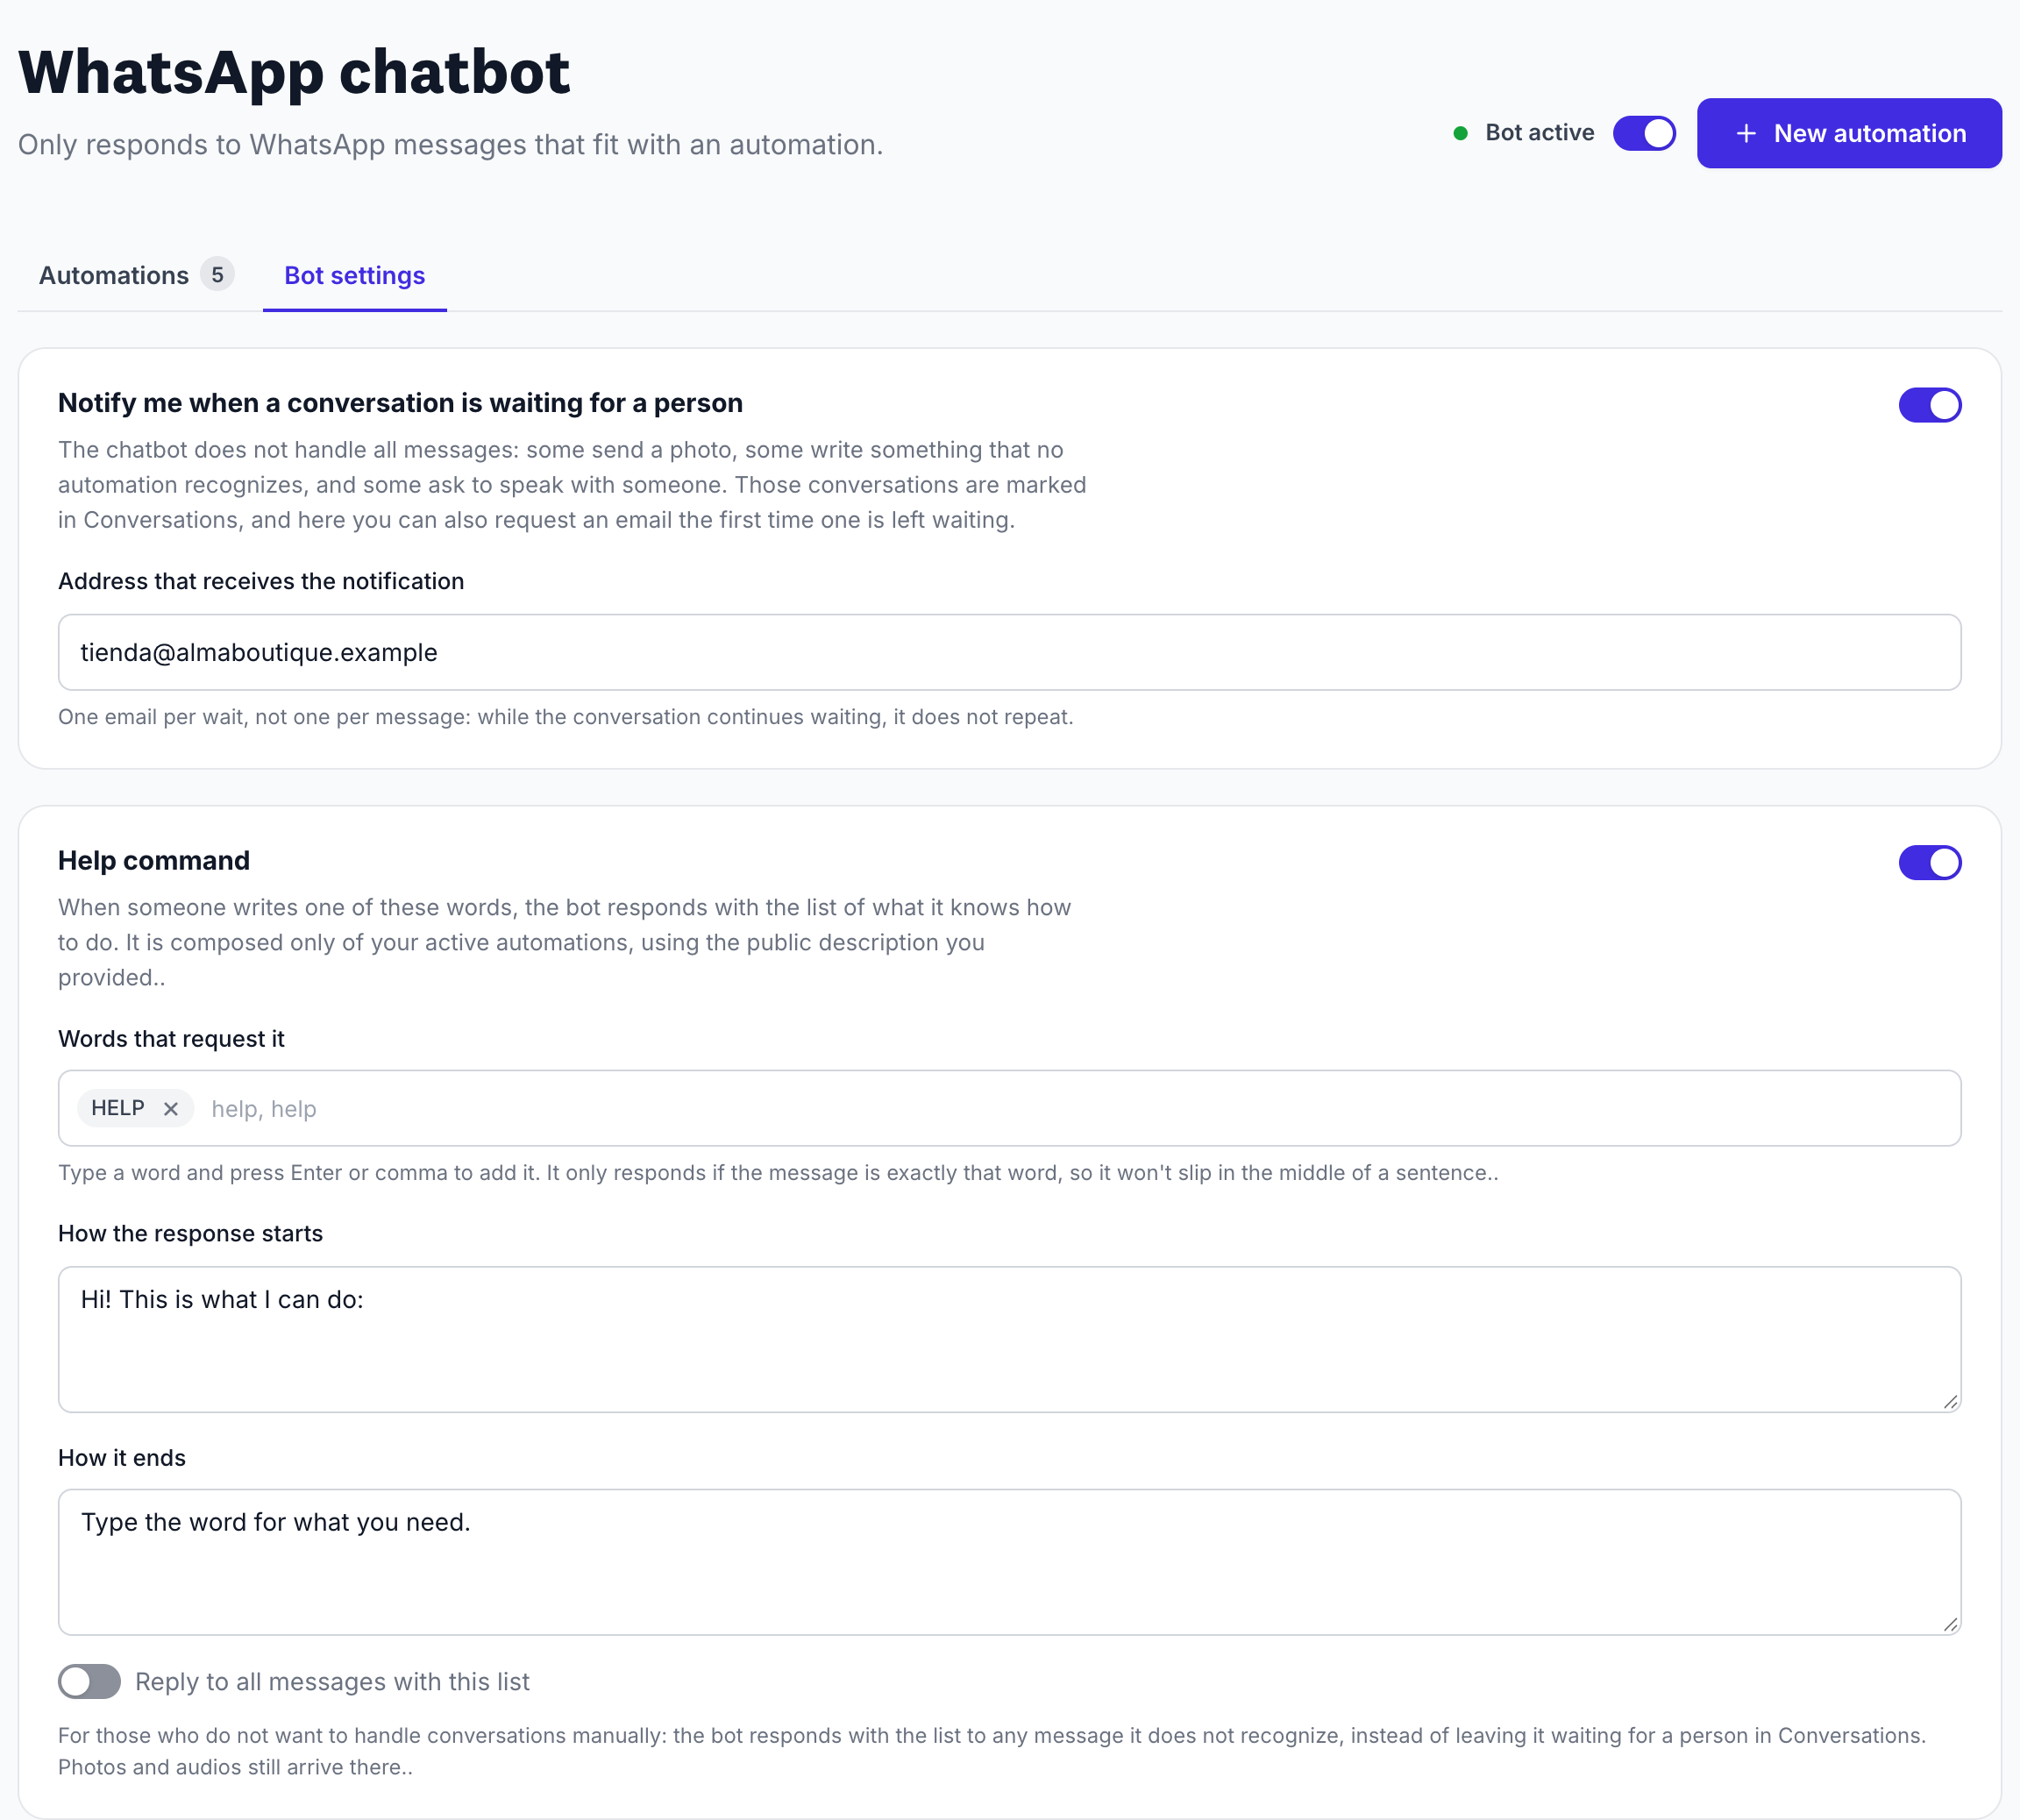
In the Bot settings tab of the list, you configure how the chatbot behaves across all automations. Changes are saved automatically.
- Notify me when a conversation is waiting for a person: sends you an email to the address you specify when a conversation is left waiting for someone on your team. It is one email per waiting period: while the conversation remains waiting, it is not repeated.
- Help command: when the contact writes the help word (by default HELP), the chatbot replies with the list of your active keyword automations, with their public description. It is disabled by default. If you enable Reply to all messages with this list, it will also send it when no automation recognizes the message, instead of leaving it waiting for a person. For this, you need at least one active, published automation that starts with a keyword.
- Unsubscribes and resubscribes: with the words UNSUBSCRIBE and SUBSCRIBE, the contact stops receiving, or starts receiving again, messages from your WhatsApp number. You can add other words and change what is replied in each case. This does not affect their email subscriptions. It is enabled by default and we recommend leaving it that way: your contacts must be able to unsubscribe. If you disable it, we’ll ask you to confirm it.
- Exit an automation: a word the contact can use to leave the current conversation without unsubscribing. It appears in the help list and only works if an automation is in progress. It is disabled by default.
- When it doesn’t recognize what they’re talking about: a message for when no automation understands what the contact has written. If you leave it empty, nothing is sent. In any case, the conversation is left waiting for a person in Conversations.
Each command supports several words: type them and press Enter or comma to add them. The words for these commands only work when the contact writes only that word, and they cannot match any automation keyword.
Statistics and responses
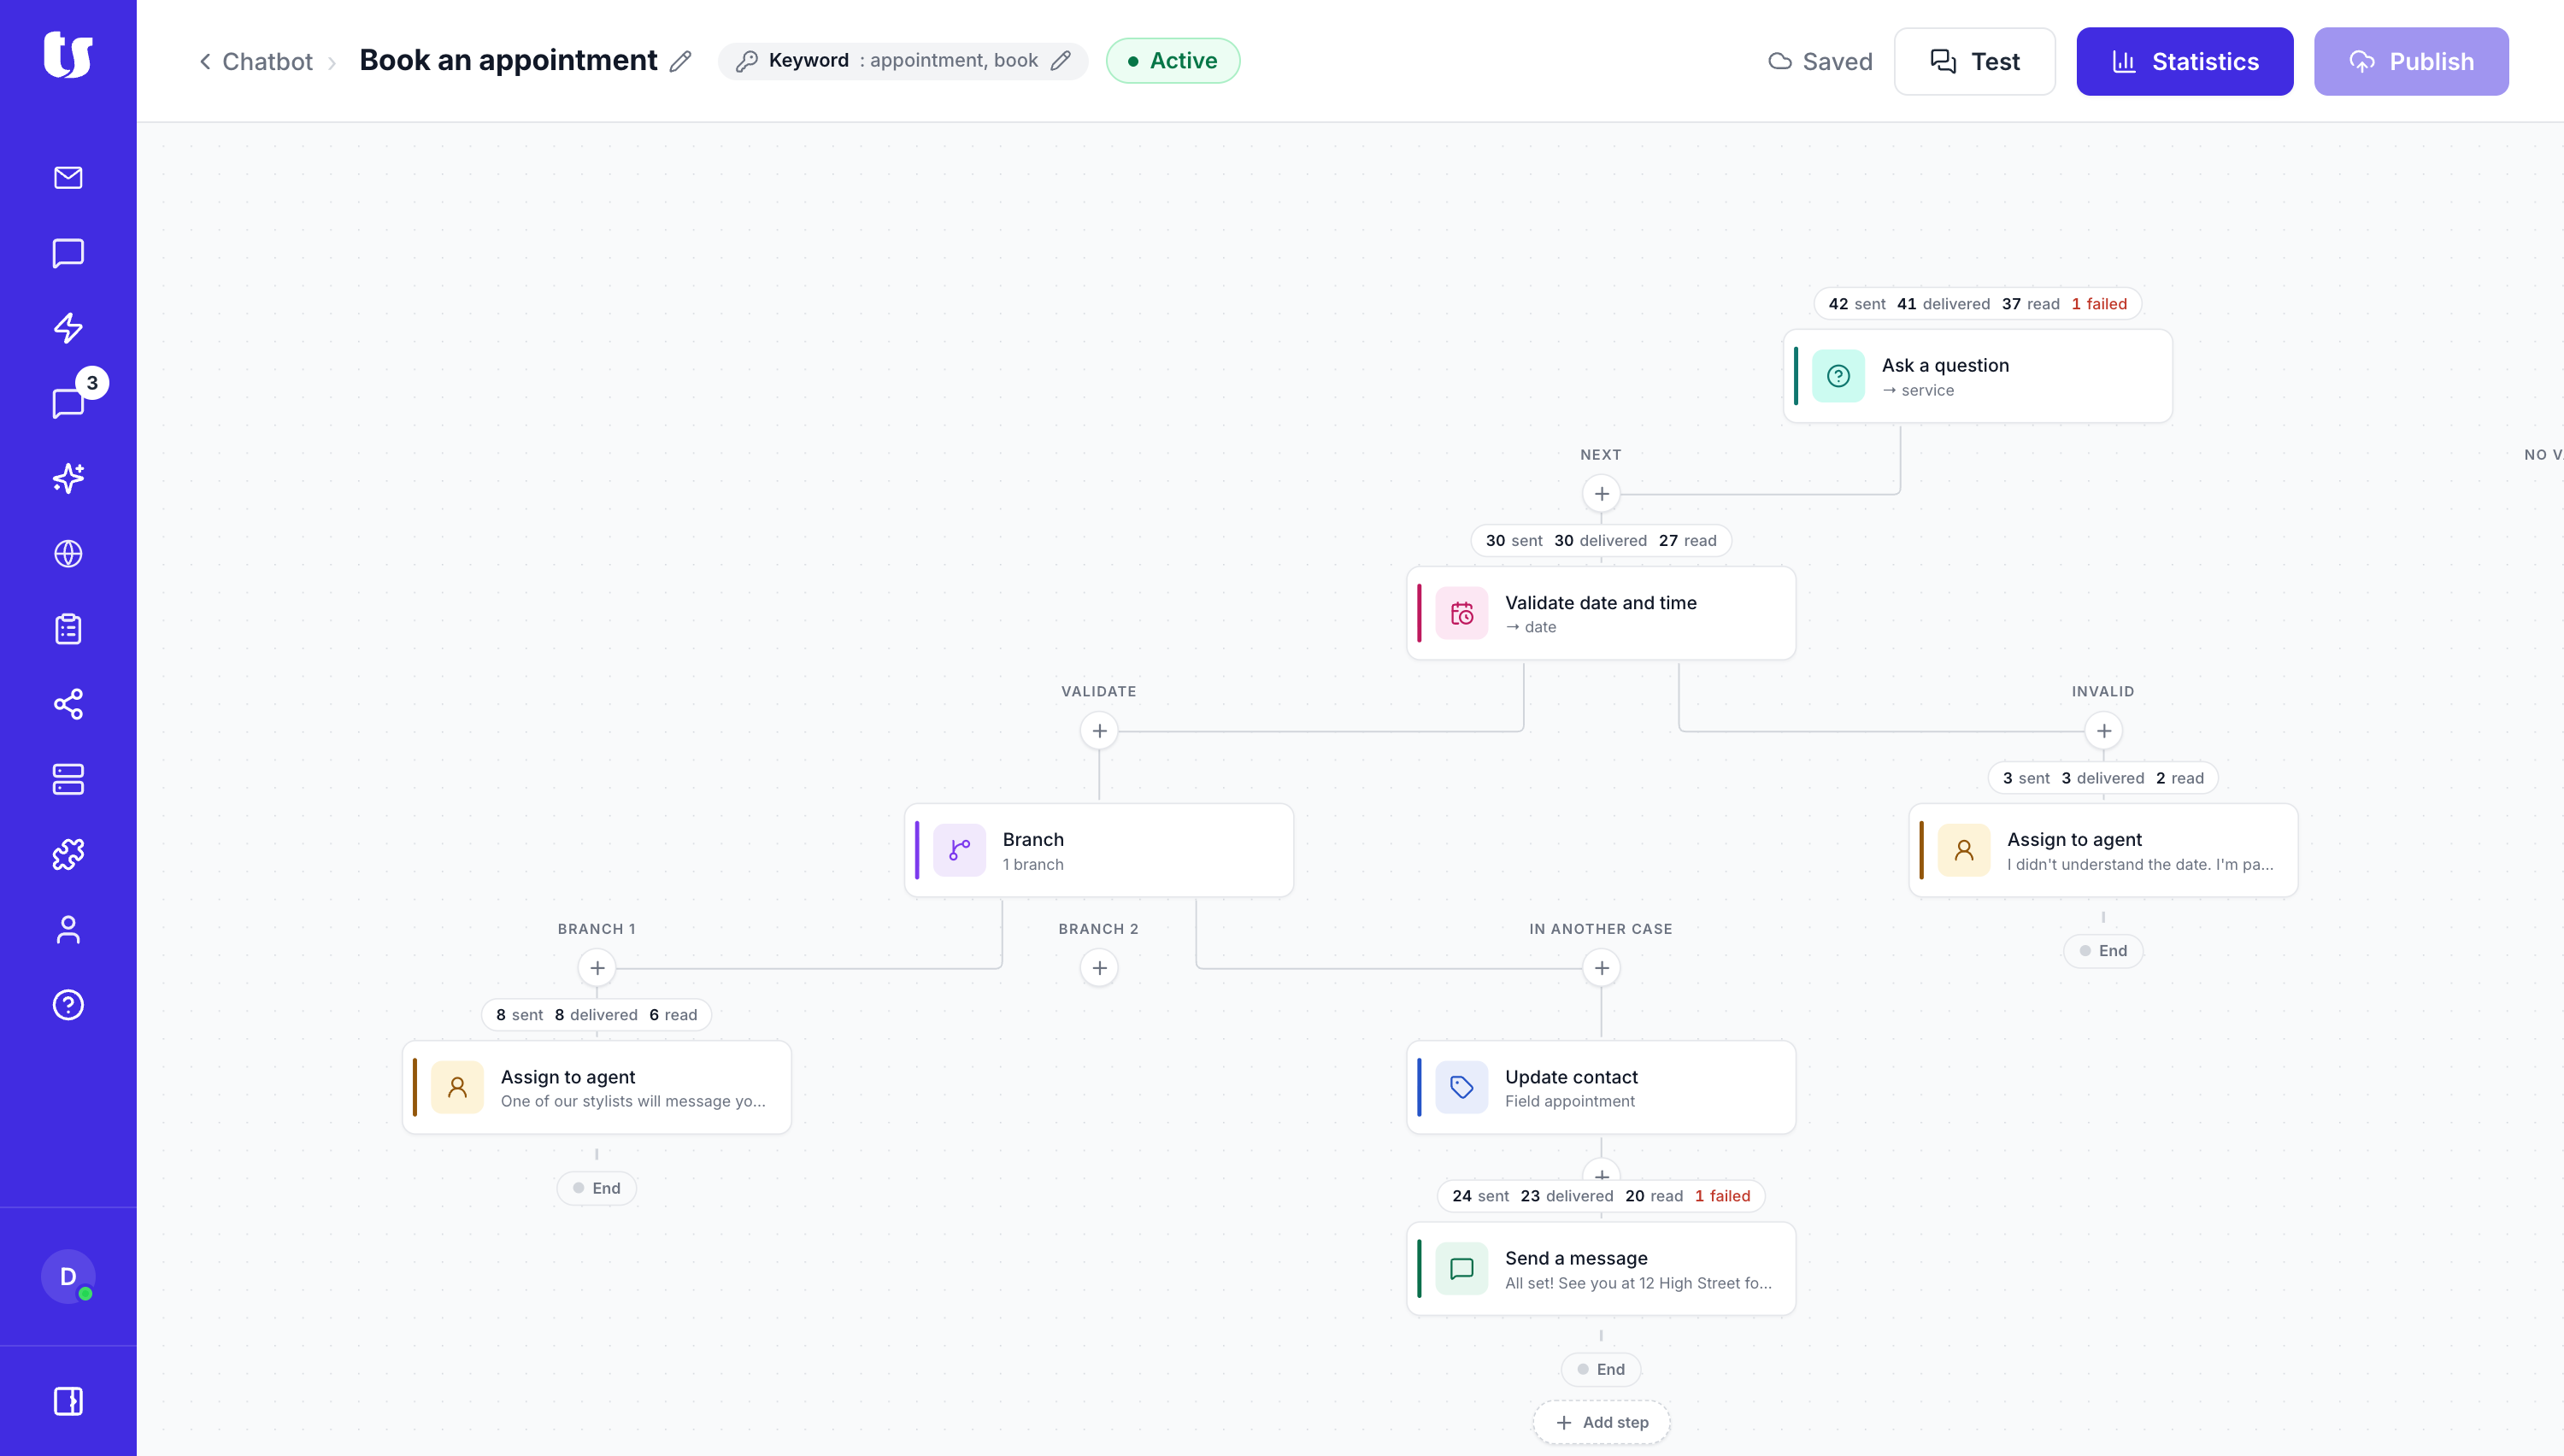
In the editor, the Statistics button shows, above each step, how many messages have been sent, delivered, read, and how many have failed. Only steps that send messages have figures, and all published versions of the automation are added together.
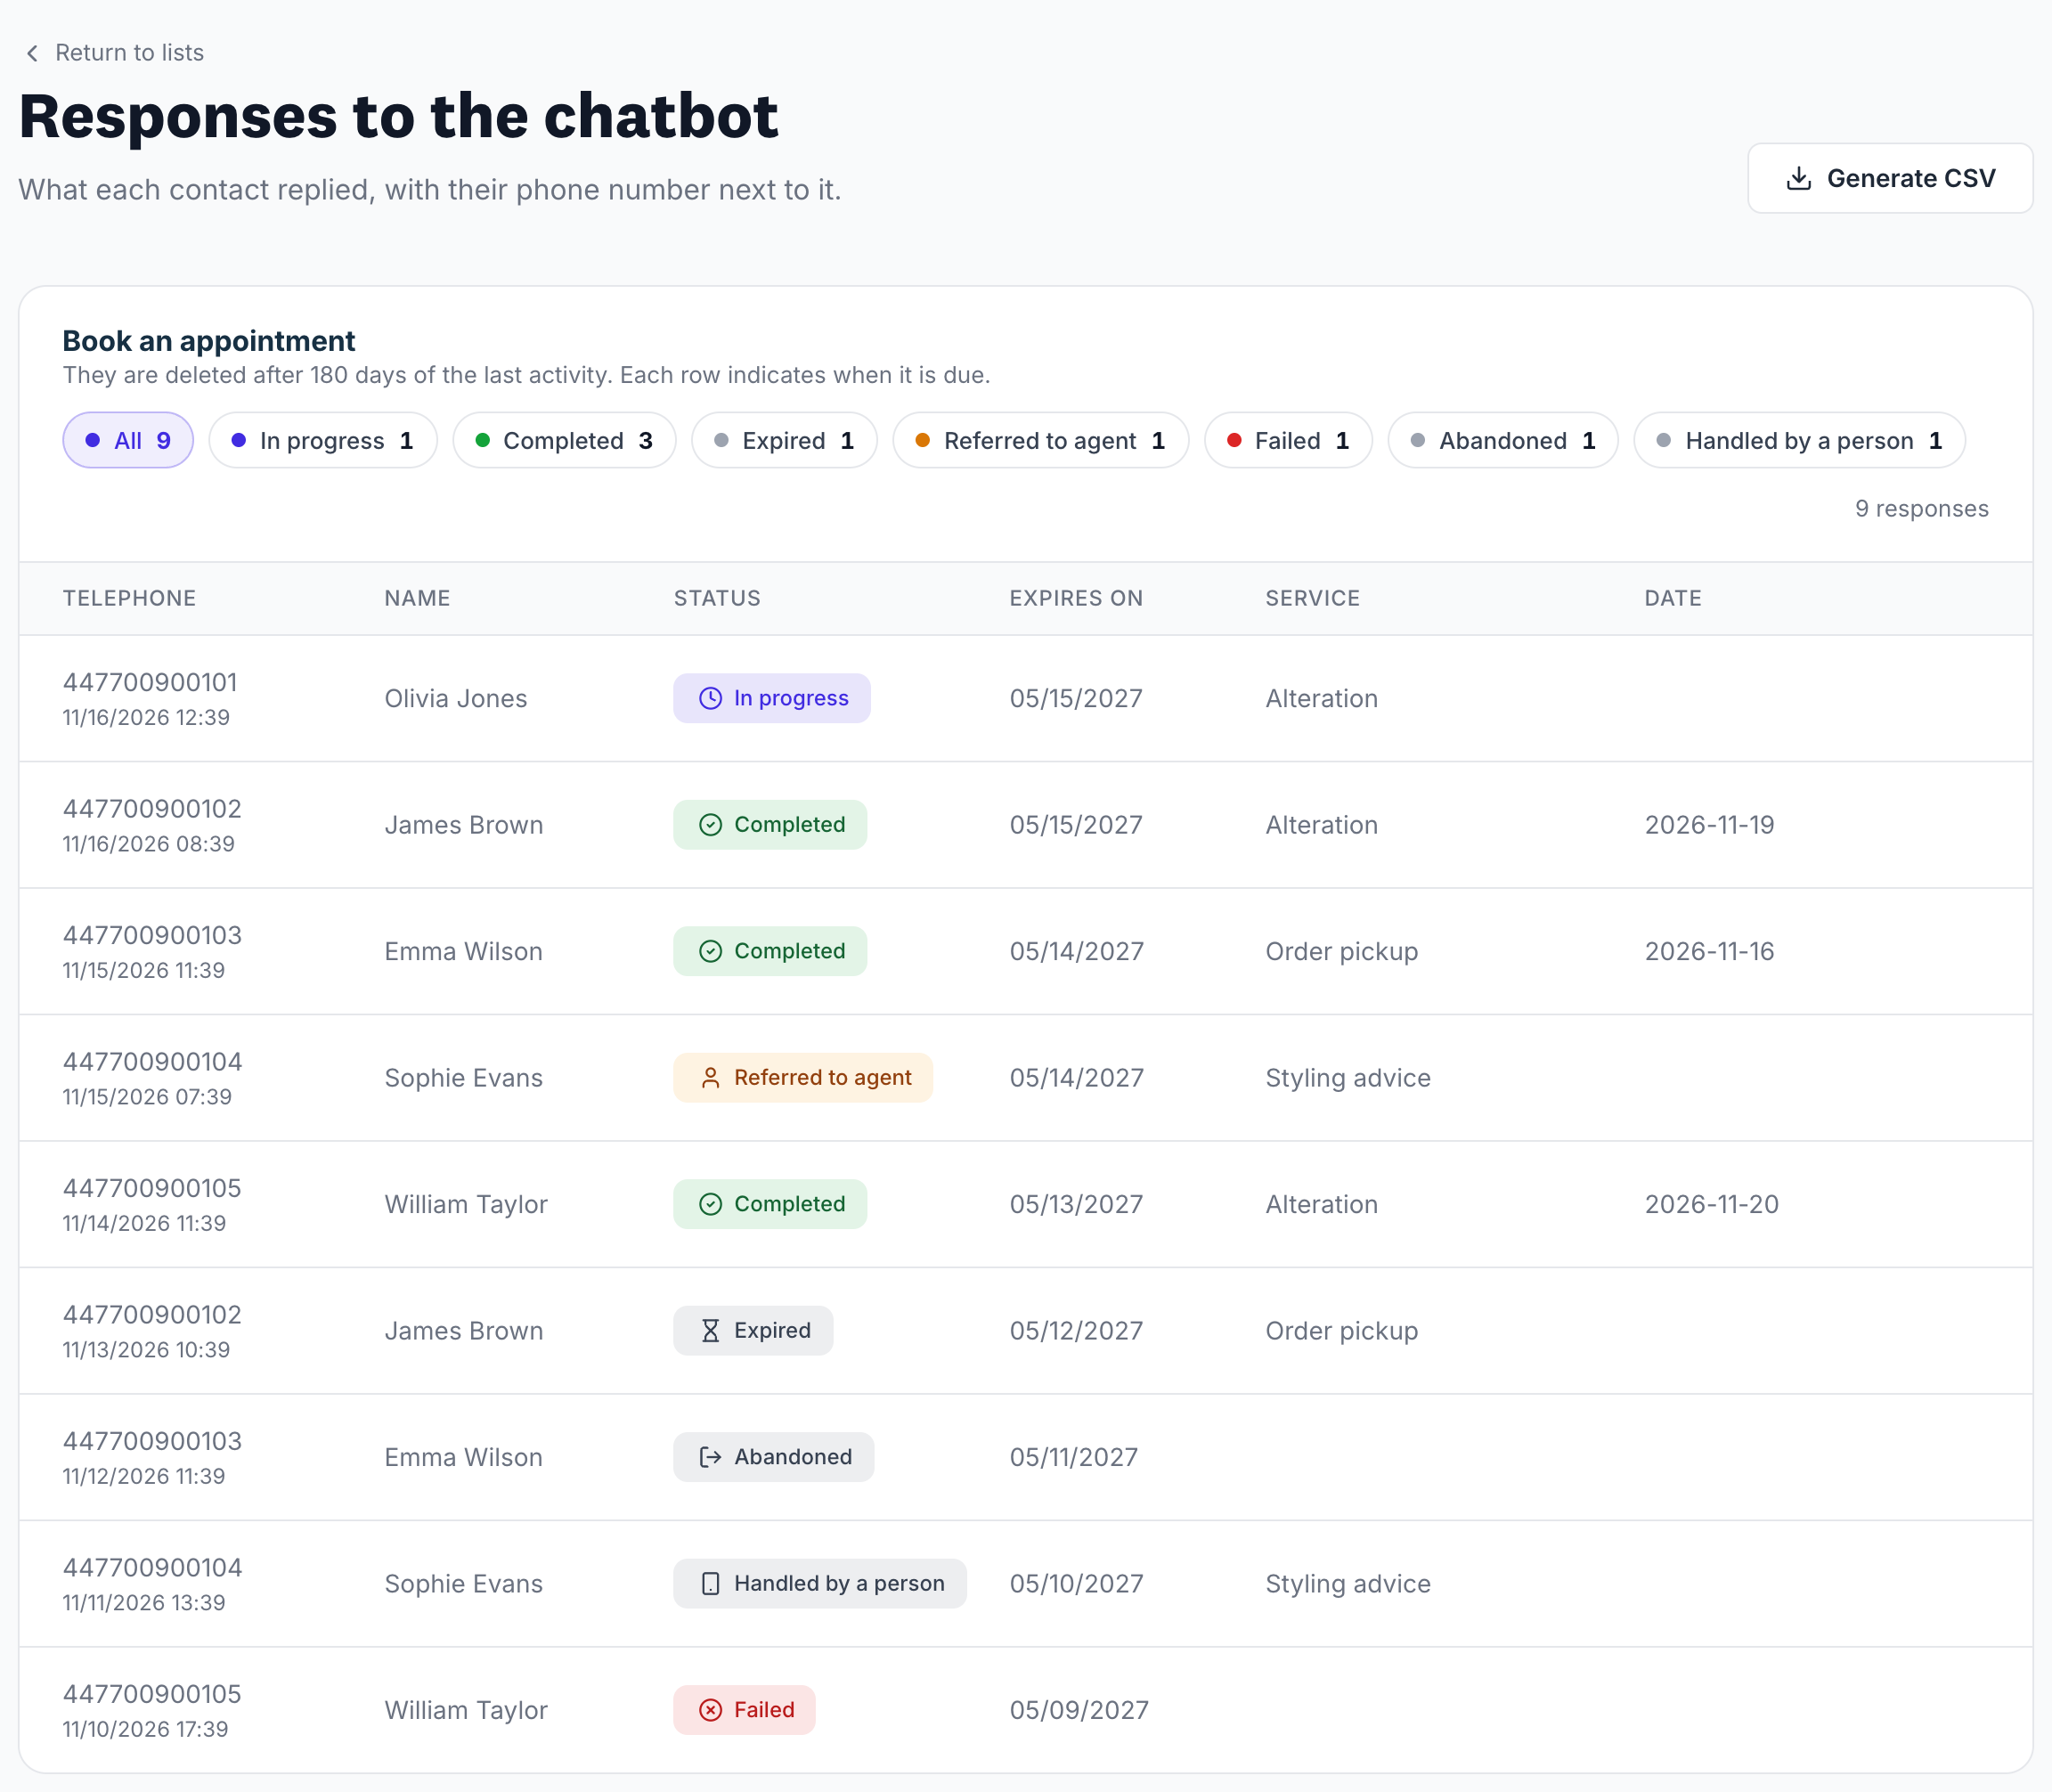
To see what your contacts have replied, in the list open the automation menu and choose View responses. You’ll see one row per conversation, so the same contact can appear several times. You can filter them by status:
- In progress: the chatbot is waiting for the contact’s response.
- Completed: the conversation reached the end.
- Assigned to agent: it was passed to someone on your team.
- Expired: the contact did not reply in time.
- Abandoned: the contact left the conversation, unsubscribed, or did not provide a valid answer.
- Failed: WhatsApp rejected a message from the chatbot.
- Handled by a person: someone on your team replied to the contact while the automation was in progress.
With Generate CSV, you can download the responses for the status you have filtered, with one column per variable; the file is separated by semicolons. Responses are kept for 180 days from the last activity of each conversation: the Expires on column indicates when each one will be deleted.
Managing your automations
From each automation’s menu in the list, you can:
- Duplicate: creates an unpublished, deactivated copy, useful for starting from one that already works. The copy keeps the trigger and keywords of the original: change them before activating it, or the original will continue responding.
- Delete: permanently deletes the automation and the responses from its completed conversations. If you want to keep them, download the CSV first. It cannot be deleted while there are conversations waiting for a response: deactivate it and wait for them to finish.
Frequently asked questions
-
The chatbot does not reply to my contacts
Check that the Bot active switch is on, that the automation is Active, and that you have published it: those that are not yet published show the Unpublished label. If it only stops replying in a specific conversation, someone on your team may have replied in it within the last 24 hours: during that time, the chatbot does not intervene (see Activating the chatbot).
-
I wrote the keyword but the automation doesn’t start
Check these causes:
- The contact has an ongoing conversation with the chatbot: while the chatbot is waiting for their answer to a question, anything they write is treated as an answer. It is released when the waiting time passes or if they use the Exit an automation word.
- The word must be complete: appointment is not triggered by “appointments”.
- Another automation uses the same word: the one created first always responds.
- You changed the keywords but haven’t published again.
- Someone on your team has replied in that conversation within the last 24 hours.
-
My contacts write HELP and nothing happens
The help command is disabled by default. Enable it in Bot settings.
-
A contact unsubscribed and the chatbot no longer replies to them
This is expected: when a contact writes UNSUBSCRIBE, the chatbot stops assisting them until they write SUBSCRIBE.
-
Does the chatbot understand photos or voice notes?
No. The chatbot only reads text and the options the contact taps. If it receives a photo, audio, or location, the conversation is left waiting for a person in Conversations.
-
What happens if the contact stops replying?
When the question’s waiting time passes, the conversation is closed as Expired, without sending any message. If the contact writes again later, it is treated as a new conversation.
-
What happens if the contact doesn’t choose any of the options?
The chatbot asks again as many times as you specify in Retries if the answer doesn’t match. If they run out, it follows the No valid answer output; if you haven’t connected it to any step, the conversation is left waiting for a person. With 0 retries, anything they write is accepted.
-
No variables appear when I click the Variables button
Only the Ask a question and Validate date and time steps create variables, and only those that are saved in all paths leading to the step you are editing appear.
-
Can the chatbot write to a contact who has not written to it before?
The chatbot replies to the messages it receives. WhatsApp only allows free-form messages to be sent within 24 hours after the contact’s last message; after that time, only approved templates can be sent.
-
Can I build the chatbot from my phone?
No. The editor needs a wide screen: on mobile or in a narrow window, you’ll see a notice asking you to open it on a computer.
-
Does Acumbamail charge me for chatbot messages?
No. The chatbot does not use Acumbamail credits. Meta may charge you for messages according to its own WhatsApp Business rates.