In Acumbamail, you can now create your marketing campaigns for WhatsApp. In this article, we explain how to create a campaign, manage your templates, subscriber lists, and check the status of sent messages.
In this article:
4. Reports
5. Lists
6. Templates
Access to functionality
This new WhatsApp functionality is only available for users with a Pro or Enterprise plan.
Login to WhatsApp
To create a WhatsApp campaign or a template, you need to be logged into Facebook through the integrated registration. To do this, click the "Login to WhatsApp" button that appears in the "Home," "Campaigns," and "Templates" sections. If it doesn't appear, you may have already logged in previously.

First, you need to log in to Facebook. If you don't have an account, create one.

Once logged into Facebook, the process of connecting with Acumbamail begins. You must click "Start" to accept the permissions you will grant us for managing the sends and message templates.

For the use of WhatsApp Business, it is necessary to create a business portfolio. If you do not have one, you can create it at this step by providing information related to your business.

Next, you must select the WhatsApp Business account you want to link with Acumbamail. If you have one, you can select it from the dropdown menu. If you do not have one or it is not available, you can create one. On the other hand, if you do not have a profile associated with a number for that WhatsApp Business account, you must create one in the lower dropdown.

To associate it with a phone number, enter that number, choose the country code, and select the verification option you prefer.

Once verified, a summary of the permissions you will grant to Acumbamail for the use of the WhatsApp functionality will be displayed again. Click "Continue."

A process will begin to check the entered data. Once completed, Meta will start a verification process for your business.

In the last step, click finish, and that's it. We will synchronize notifications related to messages and message templates with your Acumbamail account and import any text templates created in Meta if you have them.
Once logged in and the WhatsApp account you will use in Acumbamail is selected, if your phone number was not registered, we must register it. To do this, if you do not have a two-step verification PIN, you can create a new one by entering it in the pop-up. If you have a two-step verification PIN, enter it in the pop-up that will appear once the login is completed.
If you do not remember it, you can change it by following these steps:
- Go to settings, log in to your Meta Business account, and click on the business to which your WhatsApp Business account belongs.
- On the settings screen, click on WhatsApp Accounts and find the WhatsApp account for which you want to update the PIN. Click on the account, and a panel with the account information will appear on the right side of the page.
- In the WhatsApp Business Account panel, click on Settings.
- In the Settings tab, click on WhatsApp Manager.
- In the WhatsApp Manager, find your phone number and click on Settings.
- Click on Two-Step Verification.
- In the Two-Step Verification tab, click on Change PIN.
- You will be prompted to enter a new PIN and confirm it. Click Next, and you will have successfully changed your two-step verification PIN.
Finally, once the phone number is registered, to send WhatsApp campaigns, you must enter a payment method in your Meta Business account, as Meta will charge for the sends. You can do this at this link or from the "Add Payment Method" button on the final screen of the integrated registration.
To do this:
- Select the business to which your WhatsApp Business account belongs. You will be redirected to the "WhatsApp Accounts" section of your company's settings in Meta.
- Click on the WhatsApp Business account you have associated with Acumbamail and to which you will add the payment method.
- Select the settings tab, and click on the "Payment Settings" button. You will be redirected to the payment settings of the WhatsApp account within the "Accounts" section of your company's "Billing and Payments" page.
- Click on "Add payment method" if your WhatsApp Business account does not have one associated, and follow the steps shown in the pop-up to enter your payment method.
Once the payment method is added, you will be ready to create your first list and send your first WhatsApp campaign.
To log out of WhatsApp, simply click the "Log out of WhatsApp" button in the upper right corner.

Keep in mind that even if you log out, we will continue to receive status updates on your messages and templates. If you want to completely unlink your WhatsApp account from Acumbamail, click the "Disconnect WhatsApp" button that appears at the bottom of the "Home" section of WhatsApp.
Create a Campaign
From the WhatsApp section, access the Campaigns option from the main menu. Click on the New campaign button.

Enter a name to identify it and click the Create button.

Step 1: Lists
Select a list of recipients from the list and click the Next button.

Step 2: Template
Select a template and click the Use template button.
Remember that only templates that have been approved by Meta will be visible at this step.

Step 3: Configuration
When you reach step 3, a notice will be displayed about the number of conversations that will open based on the number of subscribers. Remember that Meta will charge for each open conversation. You can find more information here.

Select a sending date for your campaign or send it at that moment and review its content before sending it.

If the selected template contains parameters, you must enter the values for each of them. These values can be fixed or you can enter any of the fields associated with your subscribers. Enter the tag or from the Fields option in Lists, click on Copy command.
Refer to the Lists section for more information.

Once everything above is done, click the Send campaign button. A pop-up will then show a summary of your campaign. Click the Send campaign button to confirm the sending.

Reports
From the WhatsApp section, access the Campaigns option from the main menu.
Click on the link of your Sent campaign to see information about the sending.

Click the Recipients option in the top menu to check the status of messages sent by subscriber. From this option, you can generate and download the data in a csv file.

Click the Quick reply buttons option in the top menu to check the number of times each of the buttons included in the sent message has been clicked.

Finally, click on the Details option to see which subscribers clicked on that button.

Lists
Access the WhatsApp section and click on the Lists option that appears in the main menu.
Create a list
From the Lists option, click on the New List button. Enter a name to identify it and click the Create button.

Next, click Accept to add subscribers to your list and select the method by which you want to import:
- CSV/Excel file
- Enter manually
For more information, you can consult our article Add subscribers to your SMS list as it is done similarly.
Delete a list
Click the button with dots to show the menu associated with the list you want to delete, then click on the Delete list option.

Once a list is created, you can directly access the options to add subscribers, delete subscribers, and fields from the menu associated with each of the lists, in the ACTIONS column. Click the button with dots to show the menu.
Subscribers
Once a list is selected, click the Subscribers option in the top menu.
From this section, you can add, modify, and delete subscribers.

To edit a subscriber's fields, click on the phone or click DETAILS. Then click the Edit button.

Enter the values for each field. Remember that the value of the phone field cannot be edited. Then click the Save button.
Fields
Once a list is selected, click the Fields option in the top menu. By default, when creating a list, the "phone" field is added. This field is fixed and cannot be deleted.
Each created field has an associated tag that we can use in our campaigns. For the "phone" field, its tag would be *|PHONE|*. To add a new field, click the Add field button.

Templates
Access the WhatsApp section and click on the Templates option that appears in the main menu.
Synchronize templates with Meta
Import the existing message templates in your WhatsApp Business account.
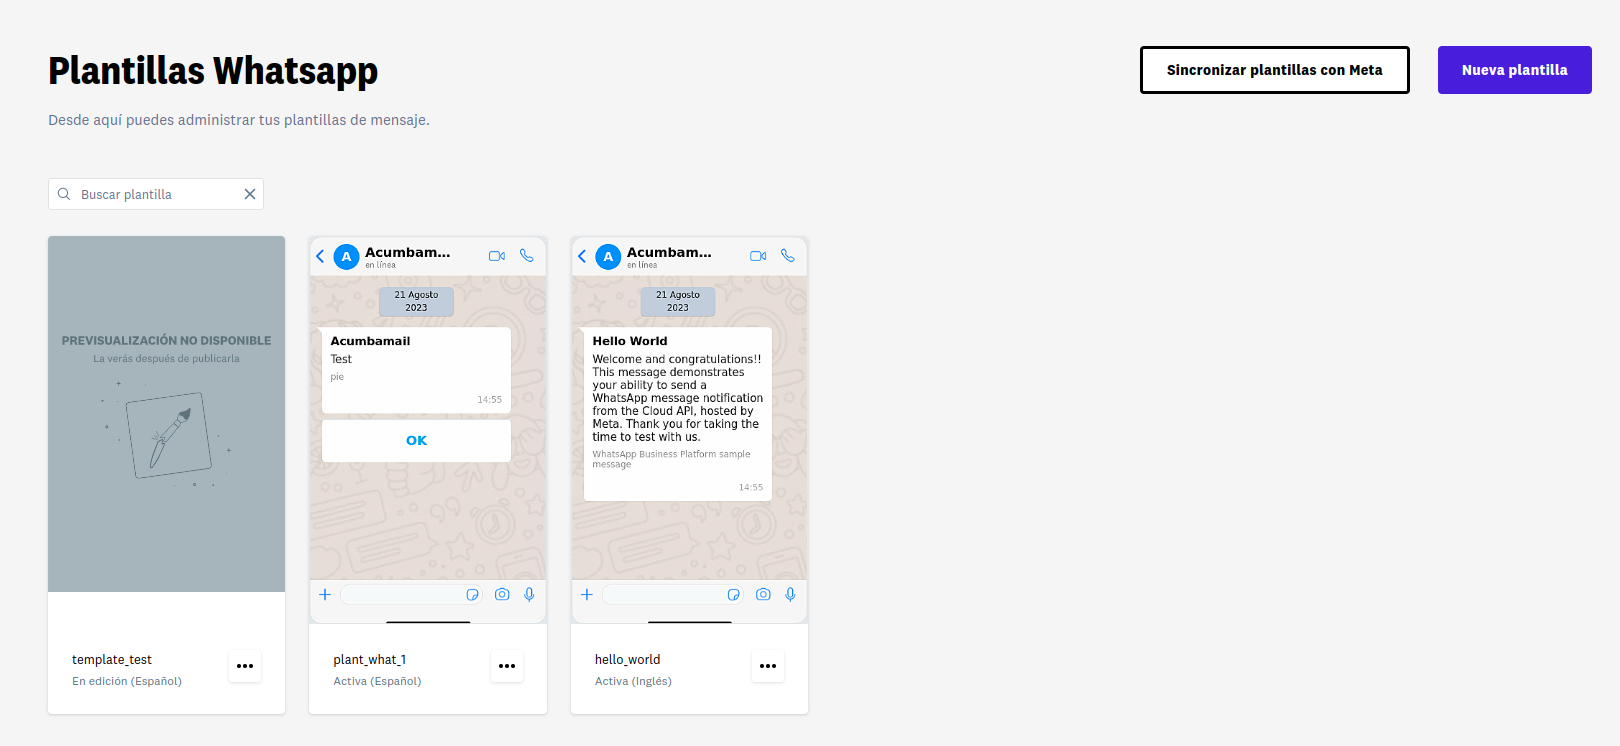
Click the Synchronize templates with Meta button and from the pop-up window, click Import. All your WhatsApp templates that you have created in your WhatsApp Business account will be imported to Acumbamail and you will be able to use them in your WhatsApp marketing campaigns.
This same function will also serve to update the status of already created templates that are pending approval.
In this first version, only templates whose content is purely text are supported. Other imported templates will not be visible.
New Template
Click the New Template button.

Enter a name to identify it and the language of the template, and click the Create button.
The name of the message template can only contain lowercase alphanumeric characters and underscores (_). No other characters or whitespace are allowed.
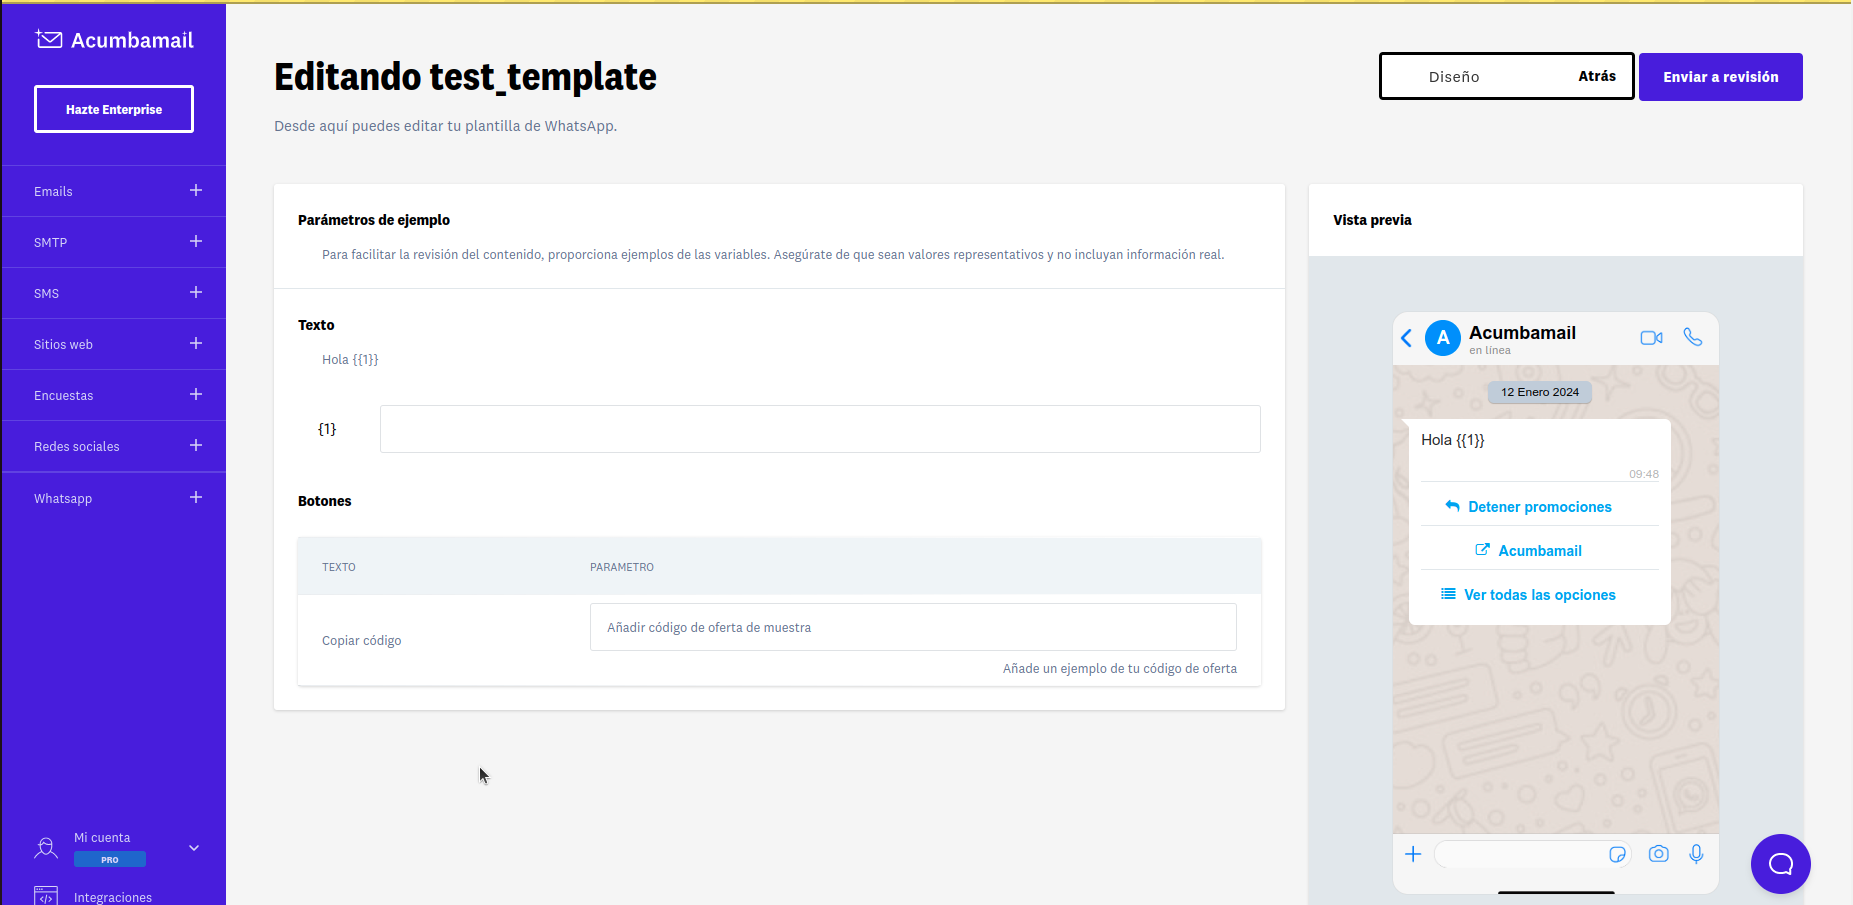
Next, enter the text of the message body.
You can add parameters or variables indefinitely, but the number of these must correspond to the text of the message. If there are more variables than text, it may be a reason for rejection by Meta.
Optionally, you can include:
- A header. Select YES in the Header section and enter the text. You can add a parameter or variable to personalize your message.
- A footer. Select YES in the Footer section and enter the footer text of the message.
- Buttons. Select YES in the Buttons section. There are two types of buttons, one for quick replies and others to associate the button with an action. You can add up to a maximum of 10 buttons, considering the following:
- "Disable marketing" button of type quick reply, there can only be one. It is recommended to add this button, as it can help you reduce the number of blocks.
- "URL" button of type call to action, there can be a maximum of two. The URL can contain a parameter. If so, it must be at the end.
- "Phone" button of type call to action, there can only be one. The phone number must have the correct format and must include the country code.
- "Offer code" button of type call to action, there can only be one.
- "Custom" button of type quick reply, there can be a maximum of 10, depending on the number of buttons added (For example, if a "URL" button and another "Phone" button have been added, we can only add a maximum of 8 "Custom" buttons).
Parameters
In the Header and Text sections, you can add parameters by clicking the Add variable button.
They can also be added manually, for this write {{n}}, where n is the corresponding parameter number, starting from 1. The values are incremented by one, cannot be repeated, and cannot have gaps, meaning they must be consecutive.
For example, we enter the following message in the Text section: "Hello {{1}}, Do you want to participate in our campaign {{2}}? It will only be available until {{3}}. Use our discount code."
Preview
On the right panel, a preview of the message that will be sent to each of the subscribers is displayed.

When there are more than three buttons, Meta only shows the first two, and the rest are shown by clicking "See all options."
Once our template is created, click Next to send it for review and obtain approval from Meta.
Example parameters
If the template contains parameters or a "Offer code" button, after clicking the previous button, you will need to enter example parameters for each of them, as they are required by Meta.
Frequently asked questions
How many lists can I send a WhatsApp campaign to?
One
Are all templates editable?
Templates can only be edited when their status is Approved, Rejected, or On hold. Templates can be edited once a day, up to a maximum of 10 times a month.
What are the main reasons for rejection when sending a template to Meta?
Little content in the message body.
I am creating a campaign but I do not see my template
Only templates with Active status, meaning they have been approved by Meta, can be used to create a campaign.
How many templates can I create?
If your main business is not verified, each of your WhatsApp Business accounts will have a limit of 250 templates. However, if your main business is verified and at least one of your WhatsApp Business accounts has a phone number with an approved display name, each of the WhatsApp Business accounts can have up to 6,000 templates.
What type of templates can I create?
From Acumbamail, we only send MARKETING type templates. Marketing templates are the most flexible. They allow businesses to achieve a wide range of objectives, from raising awareness to driving sales and retargeting customers.
The message objective can be for Recognition, Sales, Retargeting, to promote an App, or to consolidate relationships with customers.
You can find more information here.
Does Acumbamail charge me for messages sent via WhatsApp?
No, Meta is the one who charges for the messages sent and is the one who will charge you accordingly.
Why is it recommended to add a disable marketing button?
- Reduce the block rate: You will have a lower risk of interruptions in campaigns as a result. A high block rate can lead to the suspension of a campaign or a decrease in the quality rating of your phone number.
- Allow for faster scalability: Your business may encounter quality issues when scaling your marketing reach on WhatsApp. This often happens when customers block certain templates. Allowing customers to opt-out of marketing messages can reduce your block rate, which can help you increase your messaging limits more quickly.
- Give customers options on how they want to receive news from you: By allowing customers to opt-out of marketing messages, you will maintain the ability to contact them with critical information such as transactional and customer service messages.
- Gain better insights into customer preferences: Currently, your business cannot see which customers have blocked you. With the opt-out button, you will be able to see who has opted out of receiving your marketing messages. This can help you learn and improve your campaigns.
How can I create a high-quality opt-out experience?
We recommend that you continue to optimize the user experience when designing your opt-out flow. Here are some tips for creating a high-quality opt-out experience:
- Address all opt-out requests: It is important that your business takes the necessary steps to stop sending marketing messages to customers who have opted out. Otherwise, you will create a negative experience for your customers, which can affect your block rate and quality score. Acumbamail stops sending marketing messages to these customers from your registered phone number when you set up your WhatsApp account. Ask customers for feedback on why they opted out or what types of content they prefer to receive instead. This can help your business improve marketing messages and audience targeting.
- Identify the messages to which to add the marketing opt-out button: Adding a marketing opt-out button to every message can be repetitive and even encourage customers to opt-out. We see that opt-out works best when included in the following types of messages:
- The first message a customer receives from your business.
- The first message after a longer period without marketing messages.
- Messages sent to unengaged customers.