
Create SMS List
You can create a list of subscribers to send SMS to. This will allow you to create SMS campaigns and send the same SMS to multiple subscribers. It will also allow you to include unsubscribe links in your SMS, to comply with data protection policies.
In this article
Create an SMS subscriber list
To create an SMS subscriber list, you will need to access the SMS panel and then the list menu, by clicking on the Acumbamail side menu:

Once this is done, if it is the first time you create an SMS list, the following screen will appear:

On this screen, you can create a new list by clicking on any of the New List buttons, in case you already have a list created, you will still have the option to create new ones in the button at the top right, which will always be visible on this screen. When you press the New List button, a popup will appear asking you for the name of the list:

Enter the name you want and you will have your list created and you will be able to perform the following actions, which we will detail in the following sections, on it, to continue with the tutorial click on the Edit fields section:

Configure the fields that your list will contain
A very useful feature of subscriber lists is the ability to add custom fields to your list. This will allow you to add information about your subscribers to later include it in the SMS itself, for example, you can include the subscriber's name when you import your subscriber list, so you can address them by their name in the SMS text itself. If you are not going to need any extra fields in your shipments, you can move on to the next We are going to create a name field that allows us to do this. When in the list's interior menu you press the Edit fields button, a screen like this will appear:

You will be shown the fields that your list already has, in this case, as we have not added any, only the phone field will appear, which is the mobile phone of the subscriber who is going to receive the SMS. Obviously, this field cannot be deleted, as the phone is a mandatory field in SMS lists. If we press the add field button, the following popup will appear, in which we will have to enter the name of the field and the type of it:

In our case, we will enter the word name as the field name and the field type will be Text, since we are going to enter alphabetical values to save each of the names. Then we will press the Add button and the previous screen will appear with the field we just created:

We can repeat this action as many times as necessary to add the fields we want to use. We can also delete any field except the phone one by pressing the red X that appears on the right. We can also modify the name or label of the field. The labels will be the string that we want to use later in our shipments so that this field is replaced by the value assigned to each subscriber, in the case of our name label the field will be *|NAME|*. Once you have defined the fields you need for your list, you can continue with the importation of the subscribers.
Add subscribers to your SMS list
To import subscribers into your list, you must select the Add subscribers option in the menu that appears on each list page:
To import subscribers into your list, you must click on the Add subscribers button from the Subscribers menu that appears on each list page

Once this is done, the following screen will appear that will allow you to import a list of subscribers.

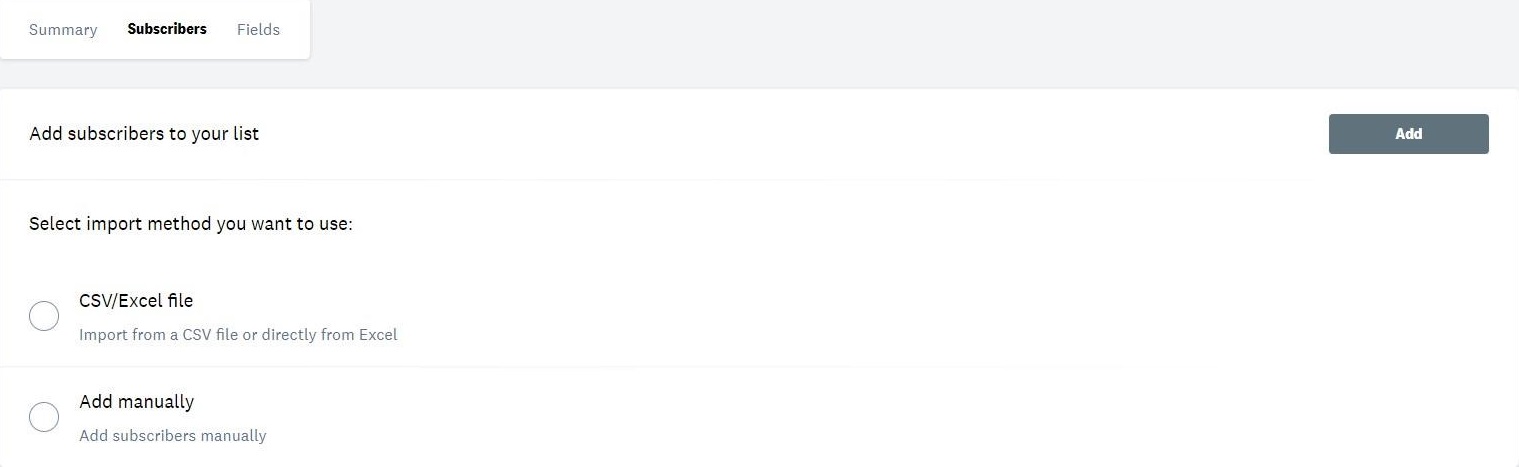
When you press the Add button, the following screen will appear, which will allow you to choose between the two methods that exist to import subscribers: upload them manually one by one or import a CSV file (basically it is a plain text file that in each row contains a subscriber and with the fields of the row separated by commas).
We will start by choosing the Enter manually option. When we select it, we will be asked for the subscriber's phone field, which we will need to fill in the popup, and then we must click Add. It is very important that when importing a phone number, the country prefix is included, as we allow sending to many countries. In the case of Spain, you can enter either 0034 or +34.

Once the phone number is filled in, you can click the Add button, and the following confirmation will appear in the upper right corner of our screen. The subscriber has been imported, and they will receive the campaigns sent to this subscriber list.

The second option that appears in the popup is somewhat more complex but very useful when you want to add hundreds or thousands of subscribers without the necessary time to do them one by one.

This is a complex form whose sections we will explain below, but first, we will introduce the CSV that we will use to exemplify each of the fields we need to fill in. Normally, not all of them will need to be filled in, but we have made it especially complex to show a more complete example. The CSV is a plain text file (CSV files can be exported from any spreadsheet system, Excel, Google Sheets, etc.) with the following content:
Name,Phone
Ignacio,65005595
Pablo,00346666666<br>
As can be seen, the file contains 3 rows: the first showing the field names and the next two showing the data of two subscribers. The first thing we need to do is drag the file to the part of the interface where it says Choose a file or drag it here. We can also click on this part, and this will allow us to select the file with our operating system's file editor. Once this is done, we will need to fill in the rest of the fields in advanced options.
| Advanced option | What it consists of | Value in the example |
| Field separator of your CSV | It is the value that will be used in the CSV to separate the fields of each subscriber; normally, this value is a comma or a semicolon. In our example, they are separated by commas. | , |
| Grouping character | It is a character used if you want to introduce the separation field within a file. Imagine that the comma appeared within the name of one of our subscribers; the system would not know how to interpret that record. It is usually left blank. |
|
| Default prefix | In Acumbamail, we send SMS to multiple countries, so we need to know the country prefix of the phones to which the SMS will be sent. In the case of our CSV, we know that our phones are Spanish, but one contains the prefix and the other does not, so we will enter the prefix for Spain (0034) to be added to the subscribers who do not yet have it. | 0034 |
| The first line determines the names of the fields | In the case of the CSV we are going to introduce, we can see that the first row contains the words Name,Phone. This means that they are the titles of the fields, so that row does not contain a valid record and should be ignored. | Checked |
Once the example file is dragged and the fields are marked as we indicated in the previous box, the form will look like this:

Once this is done, we just need to click the Add button in the upper right corner of the popup, and our import will begin. The following screen will appear to configure the fields we have included in the CSV. If we have only entered phones, we can skip this step:

In our case, we want to import both fields, so in the Discard column dropdown, we will choose the field to which we want to import it (the first column will be the name, and the second we will choose the phone value):

View the subscriber list
You can consult information about your subscriber list by clicking on two areas of the menu, in Summary and in Subscribers.

In the Summary tab, you will find a page that allows you to obtain information about the sign-ups and cancellations that your list has had, as well as access to the total, active, and inactive subscriber listings. These listings can also be viewed by clicking the Subscribers button. You will also be able to delete subscribers from the Subscribers button.
We recommend that you do not delete subscribers who have unsubscribed, as this will show the date they unsubscribed and is useful when processing any complaints that may arise, especially if a subscriber claims they unsubscribed before receiving any email.
Delete your SMS list
To delete your SMS list, you can click on the actions menu of each list and select Delete list. Remember that this action is irreversible, so be careful when deleting your lists:
